Apple Mac OS X Server Podcast Composer User Guide Version 10.6 Snow Leopard
About This Guide
This guide describes how to use Podcast Composer to create Podcast Producer workflows
Mac OS X Server includes Podcast Composer, an application for creating and deploying Podcast Producer workflows.
Important: Before you read this guide, make sure you familiarize yourself with Podcast Producer workflows by reading the relevant sections of the Podcast Producer Administration guide.
What’s in This Guide
This guide includes the following chapters:
- Chapter 1,“Podcast Composer Overview,” provides an overview of the Podcast Composer application.
- Chapter 2,“Configuring Basic Workflow Information,” describes how to set basic workflow information such as workflow title, copyright, and description.
- Chapter 3,“Configuring the Import Stage,” explains how to specify the source types of the input movies that your workflow processes.
- Chapter 4,“Configuring the Edit Stage,” covers podcast branding, which can include adding a watermark and introduction, title, and exit movies to the input movie.
- Chapter 5,“Configuring the Export Stage,” shows you how to specify the types of podcast you want your workflow to publish.
- Chapter 6,“Configuring the Publish Stage,” describes how to specify podcast publishing destinations.
- Chapter 7,“Configuring the Notify Stage,” describes how to create notifications to announce the publishing of your podcast.
- Chapter 8,“Managing Workflows,” explains how to save, verify, and deploy your podcast to a Podcast Producer server.
- Chapter 9,“Advanced Podcast Composer Topics,” discusses advanced Podcast Composer such as customizing the email template and extending workflows.
Note: Because Apple periodically releases new versions and updates to its software, images shown in this book may be different from what you see on your screen.
Using Onscreen Help
You can get task instructions onscreen in Help Viewer while you’re managing Mac OS X Server v10.6. You can view help on a server or an administrator computer. (An administrator computer is a Mac OS X computer with Mac OS X Server v10.6 administration software installed on it.)
To get the most recent onscreen help for Mac OS X Server v10.6:
- Open Server Admin or Workgroup Manager and then:
- Use the Help menu to search for a task you want to perform.
- Choose Help > Server Admin Help or Help > Workgroup Manager Help to browse and search the help topics.
The onscreen help contains instructions taken from Server Administration and other advanced administration guides described later.
To see the most recent server help topics:
- Make sure the server or administrator computer is connected to the Internet while you’re getting help.
Help Viewer retrieves and caches the most recent server help topics from the Internet. When not connected to the Internet, Help Viewer displays cached help topics.
Document Map
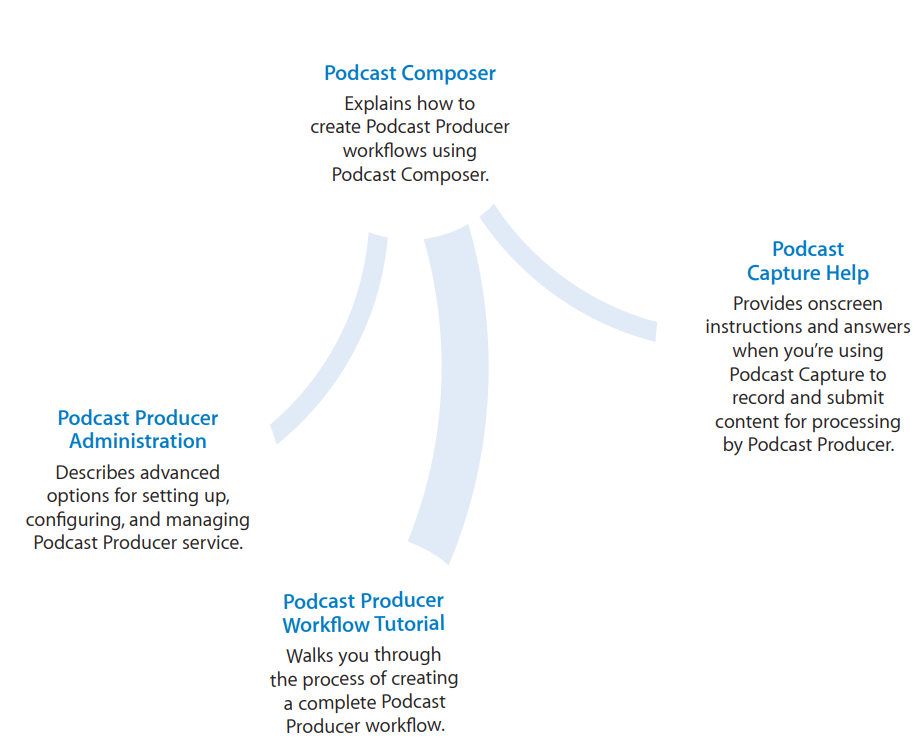
Mac OS X Server v10.6 has a suite of guides that cover management of individual services. Each service may be depend other services for maximum utility. The documentation map below shows some related documentation that you may need in order to configure your desired service to your specifications. You can get these guides in PDF format from the Mac OS X Server Resources website: www.apple.com/server/macosx/resources/
Viewing PDF Guides Onscreen
While reading the PDF version of a guide onscreen, you can:
- Show bookmarks to see the guide’s outline, and click a bookmark to jump to the corresponding section.
- Search for a word or phrase to see a list of places where it appears in the document. Click a listed place to see the page where it occurs.
- Click a cross-reference to jump to the referenced section. Click a web link to visit the website in your browser.
Printing PDF Guides
If you want to print a guide, you can take these steps to save paper and ink:
- Save ink or toner by not printing the cover page.
- Save color ink on a color printer by looking in the panes of the Print dialog for an option to print in grays or black and white.
- Reduce the bulk of the printed document and save paper by printing more than one page per sheet of paper. In the Print dialog, change Scale to 115% (155% for Getting Started). Then choose Layout from the untitled pop-up menu. If your printer supports two-sided (duplex) printing, select one of the Two-Sided options. Otherwise, choose 2 from the Pages per Sheet pop-up menu, and optionally choose Single Hairline from the Border menu. (If you’re using Mac OS X v10.4 or earlier, the Scale setting is in the Page Setup dialog and the Layout settings are in the Print dialog.)
You may want to enlarge the printed pages even if you don’t print double sided, because the PDF page size is smaller than standard printer paper. In the Print dialog or Page Setup dialog, try changing Scale to 115% (155% for Getting Started, which has CD-size pages).
Getting Documentation Updates
Periodically, Apple posts revised help pages and new editions of guides. Some revised help pages update the latest editions of the guides.
- To view new onscreen help topics for a server application, make sure your server or administrator computer is connected to the Internet and click “Latest help topics” or“Staying current” in the main help page for the application.
- To download the latest guides in PDF format, go to the Mac OS X Server Resources website:
www.apple.com/server/macosx/resources/ - An RSS feed listing the latest updates to Mac OS X Server documentation and onscreen help is available. To view the feed use an RSS reader application, such as Safari or Mail:
feed://helposx.apple.com/rss/snowleopard/serverdocupdates.xml
Getting Additional Information
For more information, consult these resources:
- Read Me documents—get important updates and special information. Look for them on the server discs.
- Mac OS X Server website (www.apple.com/server/macosx/)—enter the gateway to extensive product and technology information.
- Mac OS X Server Support website (www.apple.com/support/macosxserver/)—access hundreds of articles from Apple’s support organization.
- Apple Discussions website (discussions.apple.com/)—share questions, knowledge, and advice with other administrators.
- Apple Mailing Lists website (www.lists.apple.com/)—subscribe to mailing lists so you can communicate with other administrators using email.
- Apple Training and Certification website (www.apple.com/training/)—hone your server administration skills with instructor-led or self-paced training, and differentiate yourself with certification.
Podcast Composer Overview
Use this chapter to learn concepts about Podcast Composer and how you can use it to create Podcast Producer workflows.
Podcast Producer workflows are self-contained file bundles that contain all the information, code, and resources that Podcast Producer needs to produce podcasts.
Developing a workflow manually can be a challenging task for developers and nondevelopers alike because it involves editing XML files, using Podcast Producer command-line tools, and ensuring that all resources are included in the right place in the bundle. The more complicated the workflow is, the more time it takes to build.
Podcast Composer, an application that ships with Mac OS X Server, simplifies and speeds up the process of building workflows by providing you with a simple graphical user interface. All you do is provide infomation about the workflow, without writing XML code or worrying about where to store resources and credentials.
With Podcast Composer, creative individuals and administrators can easily develop workflows that can be immediately used, or customized later by developers.
Podcast Composer builds highly optimized workflows that take advantage of the parallel processing capability offered by Xgrid.
How Podcast Composer Works
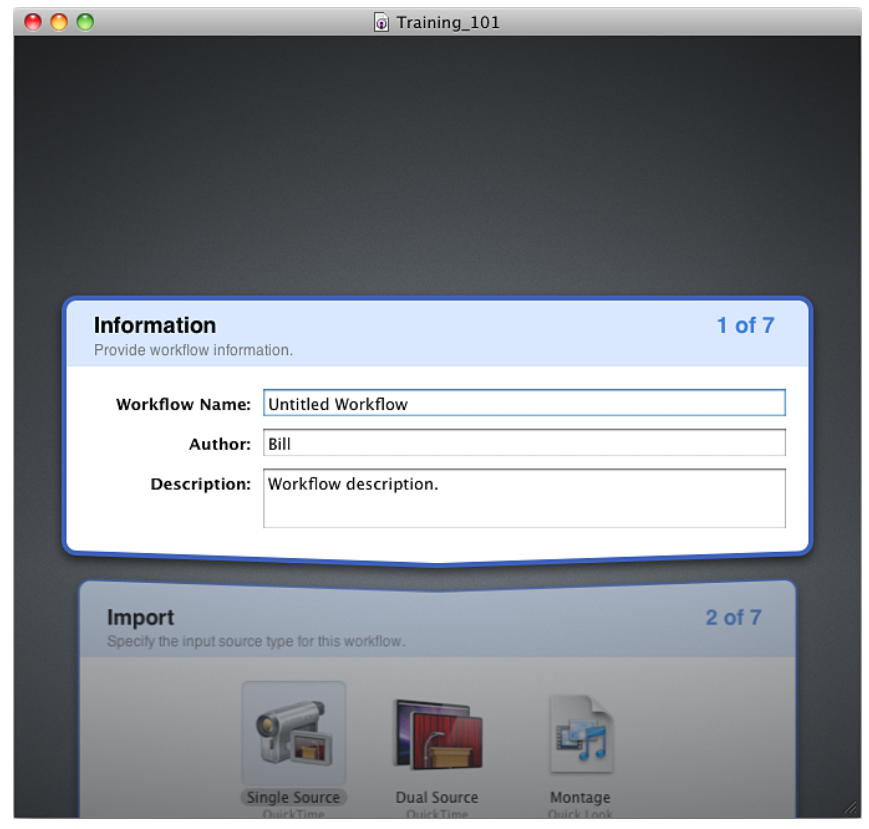
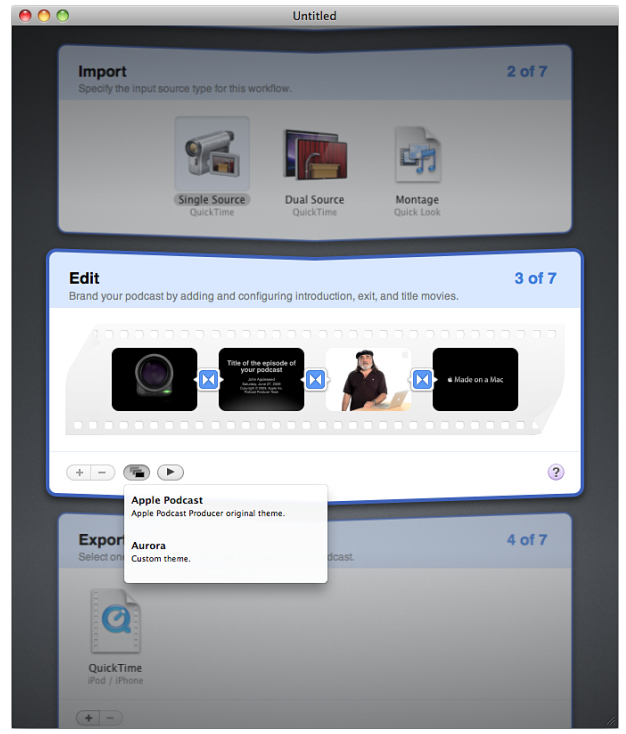
Podcast Composer groups the process of building a workflow into seven stages that step you through the process of creating a workflow:
Stage 1. Information You specify basic workflow information: workflow name, workflow author’s name, and a brief description of the workflow.
Stage 2. Import You tell the workflow what to expect as input: a single QuickTime movie, two QuickTime movies, or a set of documents that are compatible with Quick Look. The output of this stage is a singleQuickTime movie. If the input to this stage is two movies, Podcast Composer produces a picture-in-picture movie. If the input to this stage is documents, Podcast Composer produces treats document pages as images and renders them into a movie with transitions between the images. If a document is a video, Podcast Composer concatenates it with the other documents as a movie.
Stage 3. Edit You specify how you want to brand the podcast that this workflow produces by adding watermarks, introduction, title, and exit movies. The output of this stage is called the Edited Master movie. This stage produces a high quality movie at the highest possible resolution based on the resolution of the input movies. The Edited Master movie is a flat QuickTime media file that is used in the following stages of the workflow.
Stage 4. Export You select the different types of encodings to be used for publishing your podcast. For example, you might want your podcast to be available in three flavors: iPhone/iPod, Apple TV, and AAC (audio-only).
Stage 5. Publish You determine how the podcast is published. For example, you can configure the Publish stage to publish the different versions of the podcast to the Podcast Library.
Stage 6. Notify You create the notifications that you want the workflow to send after the podcast is published. You can send notifications to users and administrators with instruction on how to access the podcast. You can also send notifications to services to let them know that new content is published to the Podcast Library.
Stage 7. Summary You verify your selections. If no more changes are required, you deploy the workflow to Podcast Producer server.
When working on a particular stage, Podcast Composer keeps the previous and next stages in view to provide context.
The workflow that you generate using Podcast Composer is a file bundle. A workflow bundle contains the code, resources, credentials, workflow description, and all the information needed to execute the workflow.
In the Export, Publish, and Notify stages, you can’t have more than nine elements per stage.
Navigating the Podcast Composer Stages
Podcast Composer provides several ways to view and navigate stages.
Using the Arrow Keys
- Use the Up and Down arrow keys to move from one stage to another.
- Use the Right and Left arrow keys to move among items in a stage.
Using the Commands in the Stages Menu
- To move to a stage, choose Stage > stage name or use the Command-[stage number] shortcut. For example, to go to the Edit stage, choose Stages > Edit or press Command-3.
- To move up or down the stages, use the Stages > Previous or Stages > Next command.
- To view all stages at once, choose Stages > Overview or press Command-Return. To return to the normal view, use the same command. This command lets you switch between normal and overview views. You can also double-click the header of a stage to run the Overview mode.
You can also use the Tab and Shift-Tab keys for navigation.
Obtaining Help
To access Podcast Composer onscreen help, use the Help menu.
To access context-sensitive help about a stage, click the Help (?) button at the bottom right of the active stage.
Creating a Workflow
This section describes how to create a workflow using Podcast Composer.
To create a workflow in Podcast Composer:
- Open Podcast Composer (in /Applications/Server/).
- Choose File > New.
- Choose File > Save.
- In the Save As dialog box, enter the name of the workflow bundle and specify where to store it.
The name that you enter in this field can be different from the name you specify in the Information stage. - Go through stages 1 to 6 to configure your workflow.
Remember to periodically save your workflow while working on it.- To configure basic workflow settings, see Chapter 2,“Configuring Basic Workflow Information.”
- To specify the input source type, see Chapter 3,“Configuring the Import Stage.”
- To brand your podcast, see Chapter 4,“Configuring the Edit Stage.”
- To specify the output formats for your podcast, see Chapter 5,“Configuring the Export Stage.”
- To specify destinations for your podcast, see Chapter 6,“Configuring the Publish Stage.”
- To configure notifications announcing the publishing of your podcast, see Chapter 7,“Configuring the Notify Stage.”
- Save your workflow (see “Saving a Workflow”
- Verify your workflow (see “Verifying a Workflow”
- Deploy your workflow (see “Deploying a Workflow”
To extend your workflow, or to learn about advanced Podcast Composer topics, see Chapter 9,“Advanced Podcast Composer Topics.”
Configuring Basic Workflow
Information
Use this chapter to set the name, author, and description
information of a workflow.
Every workflow defines a set of metadata or information about the workflow. Podcast Composer lets you define three fields that are referenced in Podcast Producer server: Workflow Name, Author, and Description
Configuring Basic Workflow Information
In the first Podcast Composer stage, Information, you specify the following information or metadata:
- Workflow Name—The name of the workflow. This is the name that appears in the Workflow pane of the Podcast Producer service. It also appears in the Workflow drop-down menu in Podcast Capture. This name can be different from the name you give to the Workflow bundle you create with Podcast Composer.
- Author—The name of the workflow’s author information for your workflow. When building your workflow in Podcast Composer, you can configure the workflow settings to display the author information in the resulting podcast.
- Description—A brief description of your workflow. The description you enter here helps Podcast Producer administrators and Podcast Capture users understand what the workflow does.
When you create a workflow bundle with Podcast Composer, the Workflow Name, Author, and Description metadata is stored in the Info.plist file inside the workflow’s bundle.
To set the workflow name, author, and description information:
- In Podcast Composer, go to the Information stage (choose Stages > Information or press Command-1).
- In the Workflow Name field, enter the name of the workflow as you want it to appear in Server Admin and Podcast Capture.
- In the Author field, enter the author information for your workflow.
- In the Description field, enter a brief description of your workflow.
- Choose File > Save.
Configuring the Import Stage
Use this chapter to learn how to specify the types of the input sources to the workflow in the Import stage of Podcast Composer.
In the Import stage, you select the input source of the content your workflow processes. Podcast Composer provides three choices:
- Single Source—A single QuickTime movie as input to the workflow. The QuickTime movie can be a video recording, a screen recording, or an audio-only recording.
- Dual Source—Two QuickTime movies (with video tracks) as input to the workflow. For this choice, you cannot use a source with only an audio track. For example, a video recording of a lecturer and a screen recording of the lecturer’s slides. The video recordings can come from a remote camera and a local screen, two remotecameras, or a local camera and local screen.
- Montage—Documents as input to the workflow. These documents can be movies, images, Keynote presentations, Pages documents, PDF files, Word files, and PowerPoint files.
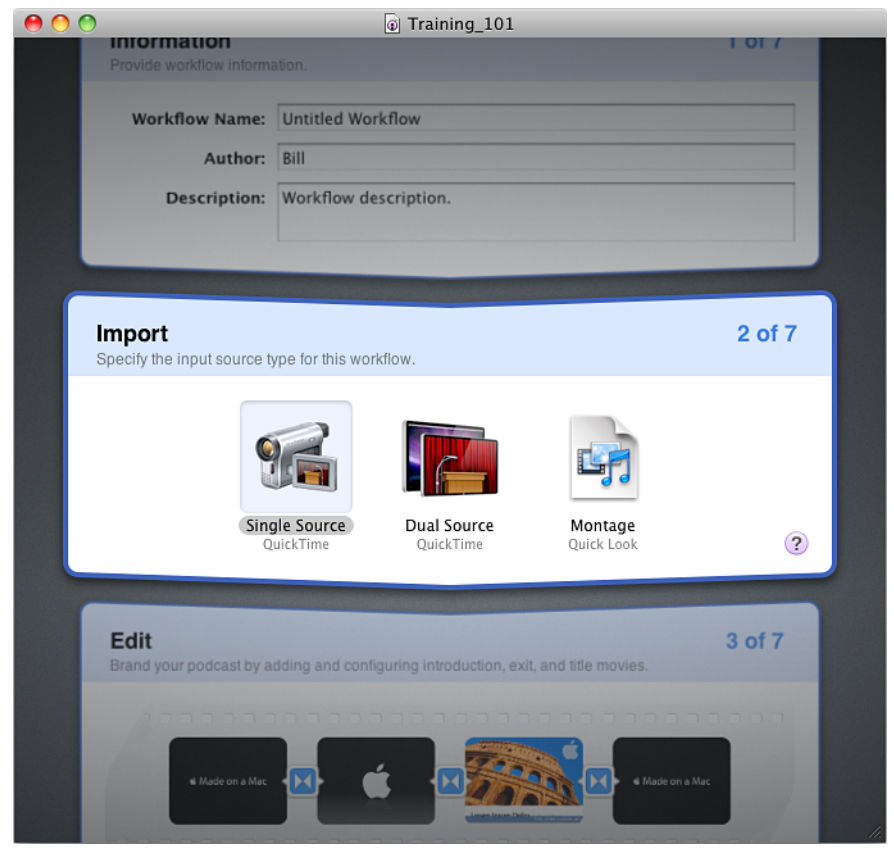
The output of the Import stage is a single movie, which is also the input movie to the next stage, Edit.
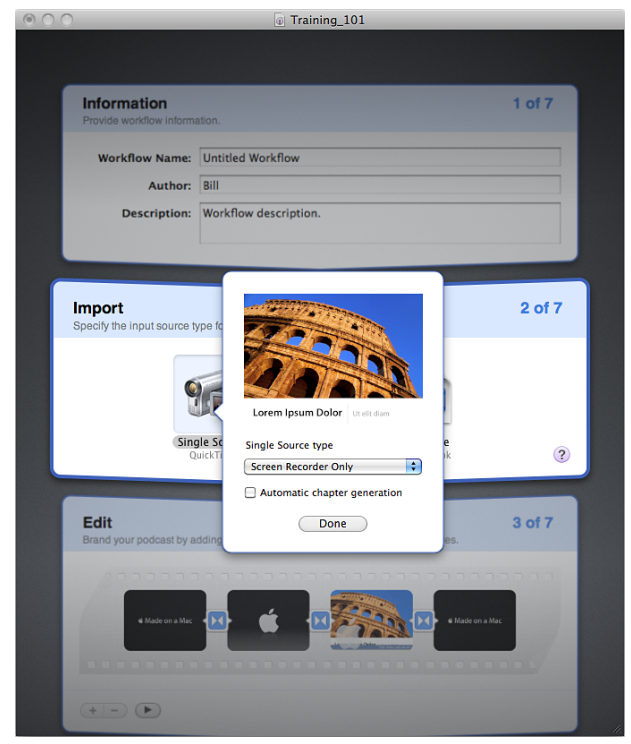
Configuring Single Source
If you want the workflow to create a podcast from only one QuickTime movie, select and configure the Single Source option of the Import stage.
To configure the Single Source option of the Import stage:
- In Podcast Composer, go to the Import Stage (choose Stages > Import or press Command-2).
- Double-click Single Source, or move your mouse over the Single Source icon and click the Information button in the bottom-right corner of the icon. If Single Source is selected, you can press Enter to display the Information dialog.
- From the Single Source Type pop-up menu, choose one of the following options to specify the type of recording Podcast Capture users can use with this workflow:
- Any—The input movie can be a video recording, a screen recording, or an audioonly recording.
- Video Device Only—The input movie is a video recording.
- Screen Recorder Only—The input movie is a screen recording.
- Audio Only—The input movie is an audio-only recording.
- If you want the workflow to automatically detect changes in the input movie and use this information to assign chapters in the generated podcast, select Automatic Chapter Generation.
In the case of a screen recording, the workflow inserts a chapter marker in the video when it detects a slide transition or when no changes occur in the video at a certain moment. This is useful when doing a screen recording or for any video that includes presentations.
The tool used by the workflow to add chapter markers detects stability in a movie by comparing frames and after the tool finds a stable sequence, it considers it a chapter. Then, when the sequence changes to another sequence, the tool consider that change a transition.
Chapter markers are recommended for screen recordings, but not for video and audio recordings. However, there are instances when adding these markers is useful, such as when the source video is for a screen recording captured from the VGA or DVI stream of a computer screen. Screen recording using Podcast Capture works only on a computer running Mac OS X v10.5 or later. - Click Done.
- Choose File > Save.
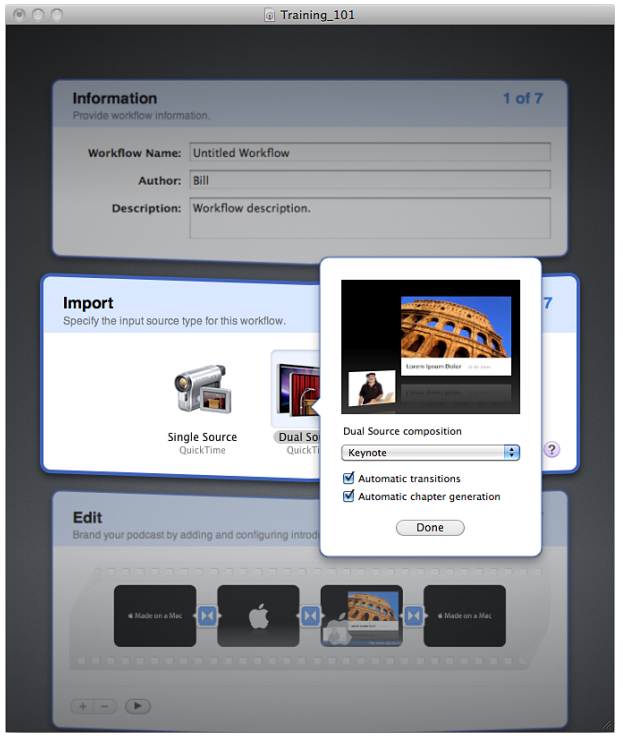
Configuring Dual Source
If you want the workflow to create a podcast from two QuickTime movies, select and configure the Dual Source option of the Import stage—for example, a screen recording of a presentation and a video of the presenter.
Important: It is recommended that you provide the audio of the entire recording in the video of the presenter and not within the screen recording.
To configure the Dual Source option of the Import stage:
- In Podcast Composer, go to the Import Stage (choose Stages > Import or press Command-2).
- Double-click Dual Source, or move your mouse over the Dual Source icon and click the Information button in the lower-right corner.
A dialog appears, displaying the settings that you can configure and a live preview box that reflects your selections. - From the Dual Source Composition pop-up menu, choose one of the following composition options to specify how the two input videos are going to be composed to create the final movie:
- Keynote Presentation—This picture-in-picture composition displays the screen recording movie in full screen and hides the second movie. After 15 seconds (by default) this composition minimizes the screen recording movie, moves it to the right, and displays the second movie in the bottom-left corner of the screen. Finally, after 15 seconds (by default) the composition brings back the screen recording movie into full screen and hides the second movie. This process repeats for the duration of the movie.
- Overlay—This picture-in-picture composition displays the screen recording movie in full screen and overlays the second movie in the bottom-right corner of the screen. Then, in response to conditions in the screen recording (for example, a slide doesn’t change for more than 20 seconds) the location of the overlay is switched, if transition detection is enabled. If transition detection is not enabled, both movies remain in their original positions.
- Overlay with Fade—This composition is similar to the Overlay composition, but instead of keeping the second movie in view all the time, this composition fades the movie in and out at certain intervals (10 seconds by default).
- Theater—This composition is similar to the Overlay composition, except that you always have a full view of the screen recording movie. This option is ideal if you don’t want any part of the screen recording to be covered by the other movie.
- If you want Podcast Composer to automatically detect transitions in the screen recording movie, select Automatic Transitions.
With this option enabled, Podcast Composer can detect slide transitions in the movie and use this information to determine when to switch movies in the composition.
If you choose not to automatically detect transitions, there will be no transition. The selected dual source composition remains static. Both movies remain in their original positions. - If you want Podcast Composer to automatically detect changes in the input movies and use this information to assign chapters in the generated podcast, select Automatic Chapter Generation.
For example, you might want chapters in the podcast to mark each transition to a\ new slide.
In the case of a screen recording, the workflow inserts a chapter marker in the video when it detects a slide transition or when no changes occur in the video for a certain moment. This is useful when doing a screen recording or for any video that includes presentations.
The tool used by the workflow to add chapter markers detects stability in a movie by comparing frames. When the tool finds a stable sequence, it considers it a chapter. Then, when the sequence changes to another sequence, the tool consider that change a transition. - Click Done.
- Choose File > Save
Configuring Montage
If you want the workflow to create a podcast from movies, images, Keynote presentations, Pages documents, PDF files, Word files, and PowerPoint files, select and configure the Montage option of the Import stage.
Podcast Composer treats the pages of these documents as images. It combines all pages of all documents into one slide presentation and generates a QuickTime video of the presentation.
For example, if your input is a PDF document and a Word document, Podcast Composer treats each page in these documents as an image. Then, Podcast Composer assembles these images into one presentation and uses the settings you specify for the Montage option to generate a QuickTime movie of a slide show of the images.
If a document isn’t in landscape mode, displaying a page in full for each slide results in text that might be hard to read because the page can’t fill the entire width of the slide.
To solve this problem, Podcast Composer slices each document page in half. The upper half image of a page appears on one slide and the bottom half image appears on the following slide. Podcast Composer also adds a transition between the two slides to provide a scrolling effect.
The documents are ordered in the slide show by their alpha-numeric order based on the file names of the source documents.
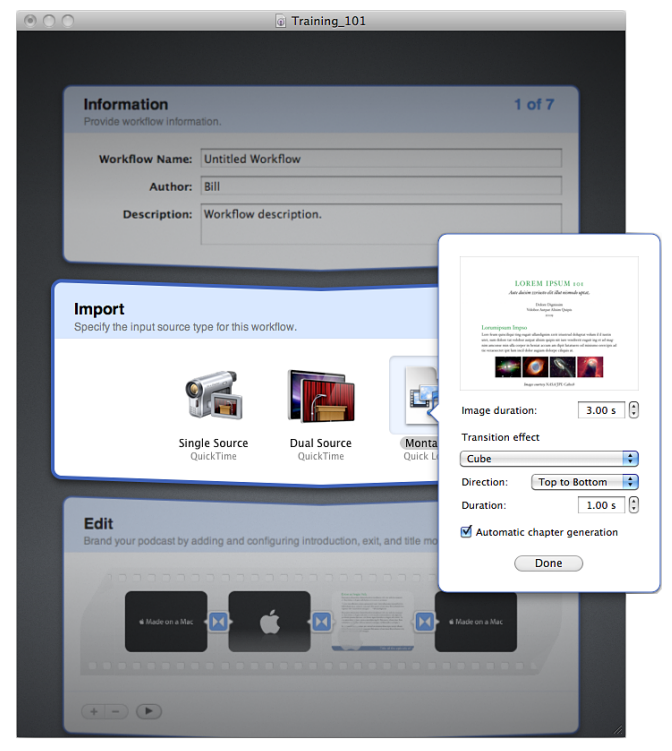
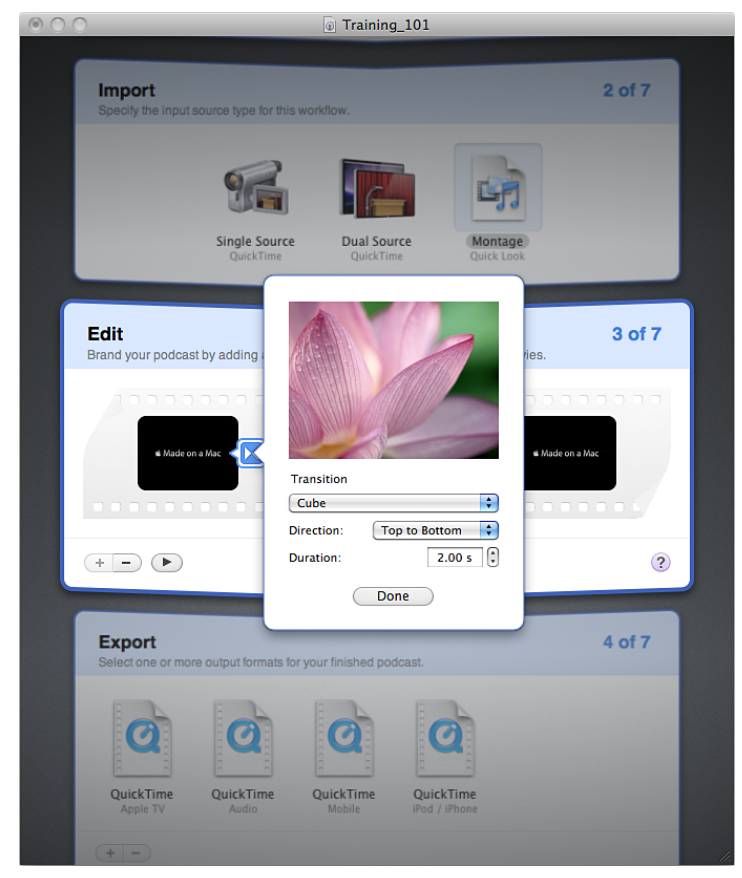
To configure the Montage option of the Import stage:
- In Podcast Composer, go to the Import Stage (choose Stages > Import or press Command-2).
- Double-click Montage, or move your mouse over the Montage icon and click the Information button in the lower-right corner.
A dialog appears, displaying the settings that you can configure and a live preview video that reflects your selections. - In the Image Duration field, enter the number of seconds that each slide is displayed.
- To specify a transition effect:
- From the Transition Effect pop-up menu, choose an effect.
- From the Direction pop-up menu, choose the direction of the effect (if applicable).
- In the Duration field, specify the duration of the transition in seconds.
- If you want Podcast Composer to automatically detect changes in the input movies and use this information to assign chapters in the generated podcast, select Automatic Chapter Generation.
For example, you might want chapters in the podcast to mark each transition to a new slide.
In the case of documents, every page is considered a chapter. The workflow uses Quick Look to extract a title from these pages, if available, to assign a meaningful title to chapters. If not available, Podcast Composer uses the filename. - Click Done.
- Choose File > Save.
Configuring the Edit Stage
Use this chapter to configure the introduction, title, and exit movies, and add a watermark to your podcast.
In the Edit stage of Podcast Composer, you can brand your podcast by adding any of the following items:
- Introduction movie—For example, you might want your podcasts to start with a 10-second movie that displays you organization’s logo.
- Title movie—For example, you might want your podcast to have a title screen that displays information extracted from the workflow’s metadata, such as title, author, copyright, and description.
- Watermark—For example, you might want the podcast to display the logo of your organization as a watermark.
- Exit movie—For example, you might want your podcasts to end with the same movie, giving credit to your organization.
You can also add transitions between these items.
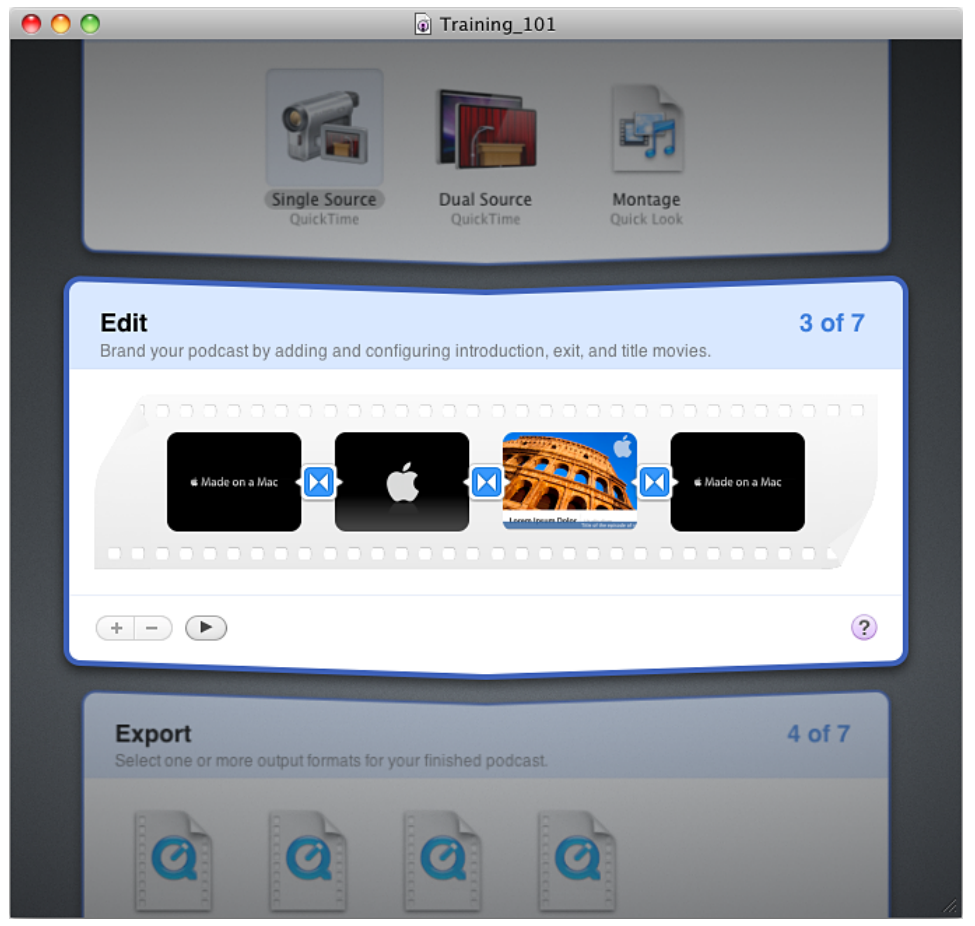
In the Edit stage, Podcast Composer places the branding items and the input movie in a timeline from left to right, in the following default order:
- Introduction movie (optional)
- Transition (optional)
- Title movie (optional)
- Transition (optional)
- Input movie
- Transition (optional)
- Exit movie (optional)
In the Edit stage, you can drag movies and watermarks onto the corresponding elements in the timeline and in dialog boxes.
In the Edit stage, you can also:
- Use the Remove (–) button or press Backspace to remove an optional item. Use the Add (+) button to add an item. To delete all optional items, press Command-Delete.
- Skim through video clips in the timeline to preview video content.
- Use the Preview button to preview the movie that will be generated by the Edit stage.
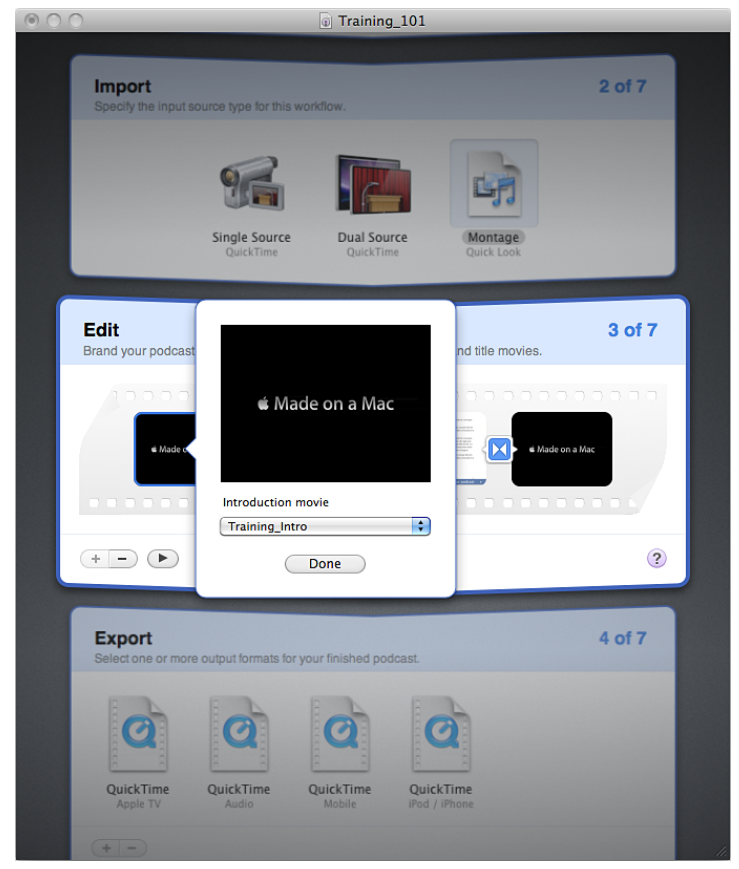
Adding and Configuring an Introduction Movie
By default, the film strip in the Edit stage includes an introduction movie. If an introduction movie isn’t present, click the Add (+) button and select Introduction to add the movie.
To configure the introduction movie:
- In Podcast Composer, go to the Edit stage (choose Stages > Edit or press Command-3).
- Double-click the icon of the introduction movie.
- From the Introduction movie pop-up menu, choose a default introduction movie that comes with Podcast Composer.
To select a custom movie, select Choose, browse for the movie, select it, and click Open. You can also drag the movie onto the preview movie in the pop-up menu.
You can also drag a movie directly onto the icon of the introduction movie without opening the pop-up menu. - Click Done.
- Choose File > Save.
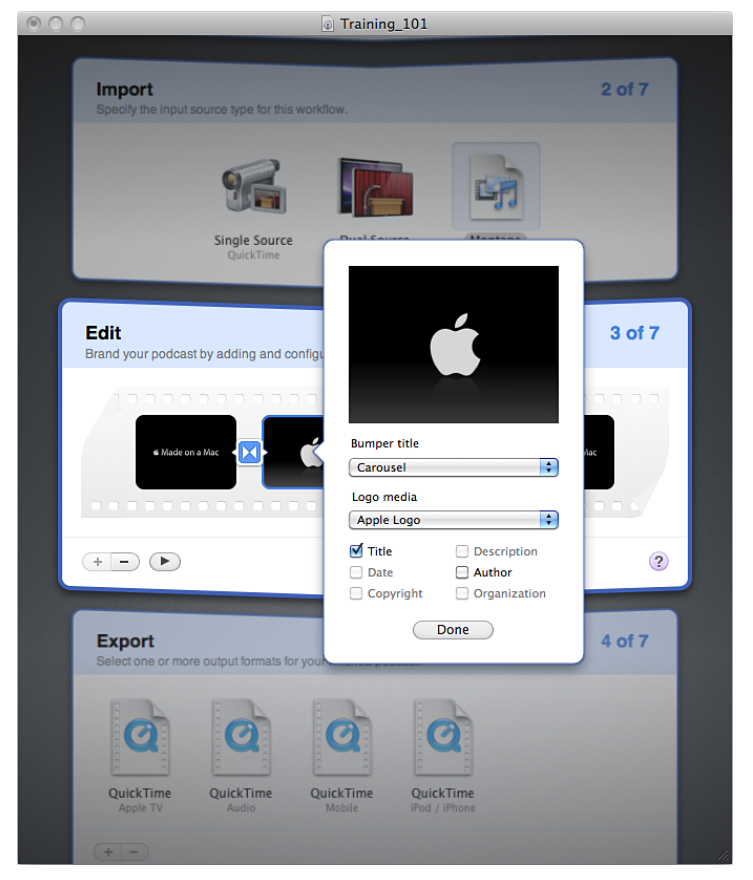
Adding and Configuring a Title Movie
By default, the film strip in the Edit stage includes a title movie. If it isn’t present, click the Add (+) button and select Title to add the movie.
To configure the title movie:
- In Podcast Composer, go to the Edit stage (choose Stages > Edit or press Command-3).
- Double-click the icon of the title movie.
- From the Bumper title pop-up menu, choose one of the default styles.
- From the Logo media, if enabled, choose a default style. You can also select Choose to add your own logo, or drag the logo onto the preview video.
- Select the items to include in the title video:
- Title
- Date
- Copyright
- Description
- Author
- Organization
Depending on your selection from the Bumper title pop-up menu, some of these items might be disabled.
- Click Done.
- Choose File > Save.
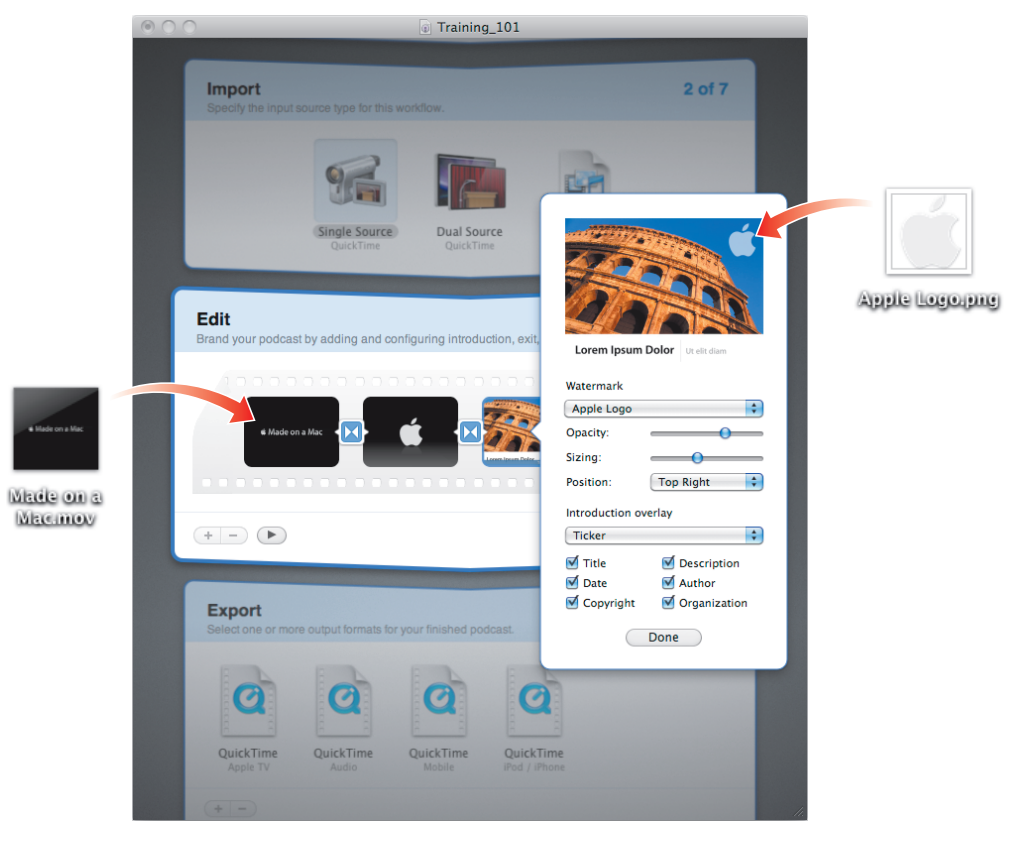
Adding and Configuring a Watermark and an Introduction Overlay
You can use the Edit stage to add a watermark and an introduction overlay to the input movie.
A watermark can be an image, a movie, or a Quartz Composition.
An introduction overlay is a title that appears on top of the movie for a specified amount of time at the beginning of the movie.

To add a watermark to the input movie:
- In Podcast Composer, go to the Edit stage (choose Stages > Edit or press Command-3).
- Double-click the icon of the input movie.
- From the Watermark pop-up menu, choose a default watermark style.
To use a custom watermark, select Choose and select the watermark. You can also drag the watermark onto the preview movie.
You can also drag a watermark onto the watermark and introduction overlay icon without opening the pop-up menu. - To specify the opacity of the watermark, move the Opacity slider to the left (more transparent) or to the right (less transparent).
- To specify the size of the watermark, move the Sizing slider to the left (smaller) or to the right (bigger).
- To specify the position of the watermark, choose an option from the Position pop-up menu.
You can also drag the logo to one of the other corners of the preview movie. - To add an introduction overlay over the input movie and under the watermark, choose an overlay style from the Introduction overlay pop-up menu.Select the information to display in the overlay by selecting checkboxes. Depending on the overlay style you choose, some of the checkboxes might be disabled.
You can also drag a movie onto the watermark and introduction overlay icon without opening the pop-up menu. - Click Done.
- Choose File > Save.
Adding and Configuring an Exit Movie
By default, the film strip in the Edit stage includes an exit movie. If an exit movie isn’t present, click the Add (+) button and select Exit to add the movie.

To configure the exit movie:
- In Podcast Composer, go to the Edit stage (choose Stages > Edit or press Command-3).
- Double-click the icon of the exit movie.
- From the Exit movie pop-up menu, choose a default exit movie that comes with Podcast Composer.
To select a custom movie, select Choose from the pop-up menu, browse for the movie, select it, and click Open. You can also add an exit movie by dragging the movie onto the live preview box. - Click Done.
- Choose File > Save.
Configuring Transitions
You can configure transitions between movies in the Edit stage.
To configure transitions:
- Podcast Composer, go to the Edit stage (choose Stages > Edit or press Command-3).
- Double-click the icon of the transition.
- Choose a transition from the Transition pop-up menu.
If you don’t need a transition, choose None. - If the Direction pop-up menu is enabled, choose the direction of the transition.
- If the Duration field is enabled, enter the duration of the transition in seconds.
- Click Done.
- Choose File > Save.
Previewing the Podcast
The Edit stage provides a live preview window where you can preview the QuickTime movie generated by the Edit stage. While the window is open, changes you make in the Edit stage are instantly reflected in the live preview.
To open the live preview window:
- n Podcast Composer, go to the Edit stage (choose Stages > Edit or press Command-3).
- Click the Preview button.
To display a bigger live preview window, alt-click the Preview button.
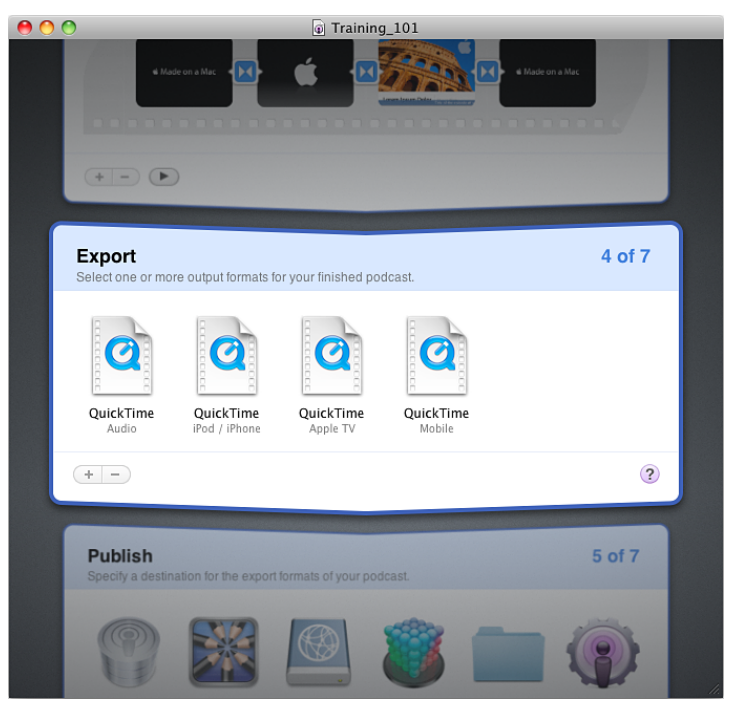
Configuring the Export Stage
Use this chapter to learn how to specify the encoding formats to use for publishing your podcast.
In the Export stage of Podcast Composer, you select output formats for your podcast. For example, to optimize your podcast for iPhones and Apple TV, you can select those two formats in the Export stage. For every format you select in the Export stage, Podcast Composer creates a corresponding task in the workflow.
Podcast Composer supports the following QuickTime encoding formats:
- Apple TV
Video: H.264 Video, 1280 x 720, 5 Mbps, 30 fps
Audio: AAC-LC Music, Stereo, 128 kbps, 44.1 kHz - Audio
Video: None
Audio: AAC-LC Music, Stereo, 128 kbps, 44.1 kHz - Computer
Video: H.264 Video, 1920 x 1080, 10 Mbps, 30 fps
Audio: AAC, Stereo, 256 kbps, 44.1 kHz - iPod / iPhone
Video: H.264 Video, 640 x 480, 1.5 Mbps, 30 fps
Audio: AAC-LC Music, Stereo, 128 kbps, 44.1 kHz - Mobile
Video: H.264 Video, 176 x 144, 56 kbps, 15 fps
Audio: AAC-LC Music, Mono, 24 kbps, 16 kHz
Podcast Composer lets you specify custom encoding formats that you create with the Compressor application, which must be installed on the computer running Podcast Composer and launched at least once before you can use it with Podcast Composer. The Compressor application should also be installed on the Xgrid nodes used by Podcast Producer to run the workflow.
Compressor is a post-production application. It ships with Final Cut Studio.
Note: Only a few default Compressor encodings are playable on an iPod or iPhone. Before deploying a custom composition, be sure it fits the target device requirements.
Adding QuickTime Encoding Formats
You can add up to four QuickTime encoding formats in the Export stage.
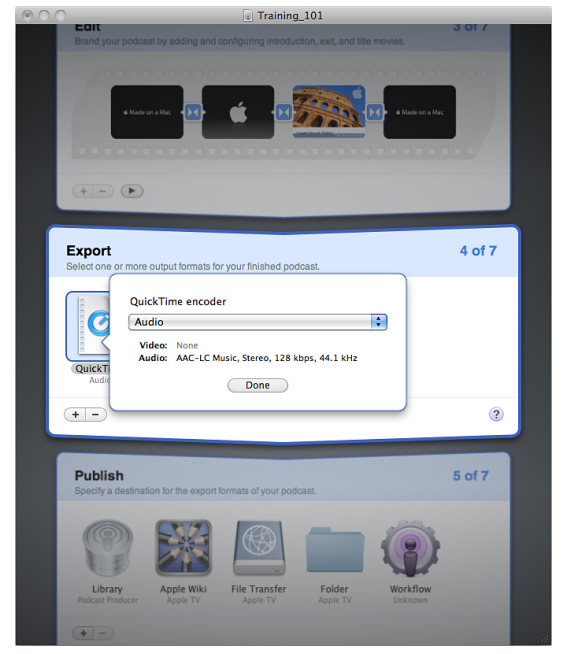
To add a QuickTime encoding format to the Export stage:
- Command-4).
- Click the Add (+) button.
If the Compressor plug-in is installed, a pop-up menu appears. - Choose QuickTime.
A QuickTime encoder is added to the Export stage and a dialog box appears. - From the QuickTime Encoder pop-up menu, choose the encoder you want to use.
- Click Done.
- Choose File > Save.
Adding Compressor Formats
Podcast Composer supports encoding formats that you create using the Compressor application. However, you must first install Compressor on your computer. For more information on how to install Compressor, see the Compressor documentation.
To add Compressor encoding formats to the Export stage:
- n Podcast Composer, go to the Export stage (choose Stages > Export or press
Command-4). - Click the Add (+) button.
- From the pop-up menu, choose Compressor.
A Compressor encoder is added to the Export stage and a dialog appears. - From the Compressor Encoder pop-up menu, choose the encoder you want to use.
This menu shows the custom encodings you created using Compressor. - To use the Apple Qmaster distributed processing system to speed up the encoding process, click “Use remote Qmaster” enter the required information.
Apple Qmaster speeds up encoding of a movie at a time by dividing the total number of frames in a job into smaller segments. Each of the processing computers then works on a different segment. Because the nodes are working in parallel, the job is finished sooner than it would be on a single computer. Note: To produce a podcast as fast as possible, use Compressor (running on Xgrid) and Qmaster (with segment and encoding setup). To produce many podcasts as fast as possible, use default encoders or Compressor running on Xgrid.
For more information about the Apple Qmaster distributed processing system, see Apple Qmaster 2 and Compressor 2 Distributed Processing Setup. - Click Done.
- Choose File > Save.
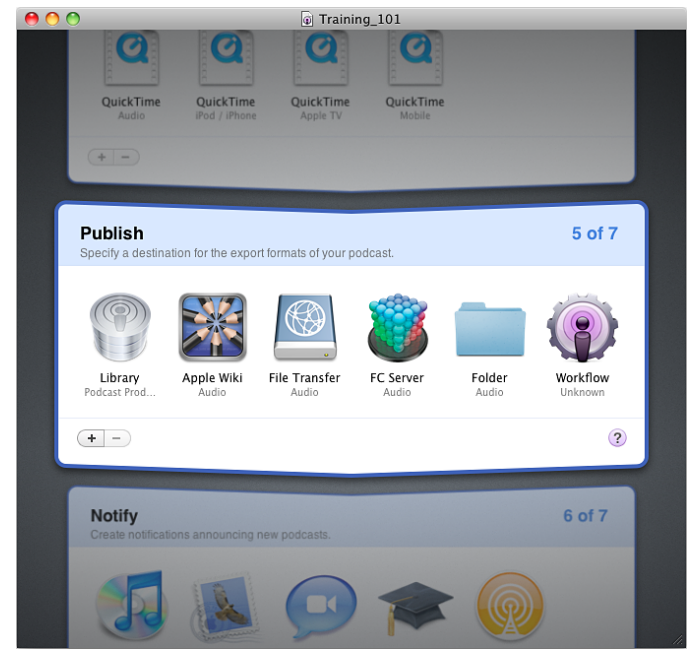
Configuring the Publish Stage
Use this chapter to specify and configure the publishing destinations of your podcast.
In the Publish stage, you specify a destination for each podcast export format you added in the Export stage.
The Publish stage supports the following content destinations:
- Podcast Library
- Apple Wiki (optional)
- File Transfer (optional)
- Final Cut Server (optional)
- Folder (optional)
- Workflow (optional)
Sending Content to the Podcast Library
The Podcast Library is where Podcast Producer stores published content. The Podcast Library publishes the content through Atom or RSS feeds, and keeps track of your content automatically.
Podcast Library is the default Podcast Producer distribution system in Mac OS X Server v10.6. This provides an easy solution out of the box.
For more information about Podcast Library, see Podcast Producer Administration.

To add the Podcast Library to the Publish stage:
- In Podcast Composer, go to the Publish stage (choose Stages > Publish or press Command-5).
By default, the Podcast Library is added to the Publish stage. - Double-click the Podcast Library element.
- In the dialog box, from “Publish media files to Podcast Library” pop-up menu, select the media file to publish to the Podcast Library:
- Original Sources—Select this option to archive the original source files used to create your podcast.
- Preview Files—Select this option to archive the preview files generated by Podcast Composer.
- Edited Master—Select this option to archive the edited master file from which encded content is generated. This is a high-quality flat movie that you may need later if you want to re-encode the podcast using a different format.
- Generated Media Files—Select this option to publish the media files generated by the workflow.
- (Optional) In the Tags field, add tags, separated by commas, to make it easier to find your content.
The Podcast Library adds these tags to every published media file, and creates a feed for every tag.
Tags are a good and easy way to create multiple feeds for the same podcast. For example, you might want to have some podcasts be accessible based on the year of the class and the department’s name. - lick Done.
- Choose File > Save.
Sending Content to an Apple Wiki Server
One way to publish podcasts is to post your podcast on an Apple blog. You can add one or more Apple blog destinations.

To post a podcast to an Apple wiki:
- In Podcast Composer, go to the Publish stage (choose Stages > Publish or press Command-5).
- Click the Add (+) button and choose Apple Wiki. A dialog box appears.
- From the “Podcast to post to the Apple wiki” pop-up menu, choose the podcast format for posting to the blog.
- In the Server field, enter the address of the blog.
- If the wiki requires Secure Socket Layer protection, select Use Secure Socket Layer (SSL).
- In the User Name and Password fields, enter the administrator credentials to access the blog.
- To specify the destination of the podcast in the blog, select one of the following options:
- Submitting user’s blog—The blog of the user who submitted the podcast.
- Custom blog—In the corresponding field, enter the user name of the blog’s owner.
- Custom wiki—In the corresponding field, enter the group name required for accessing the wiki.
- Click Done.
- Choose File > Save.
Sending Content Using File Transfer Protocols
Podcast Composer lets you send content to backup file systems using these file transfer protocols:
- FTP
- FTPS
- SFTP
- WebDav
- WebDavs
You can add one or more File Transfer destinations.
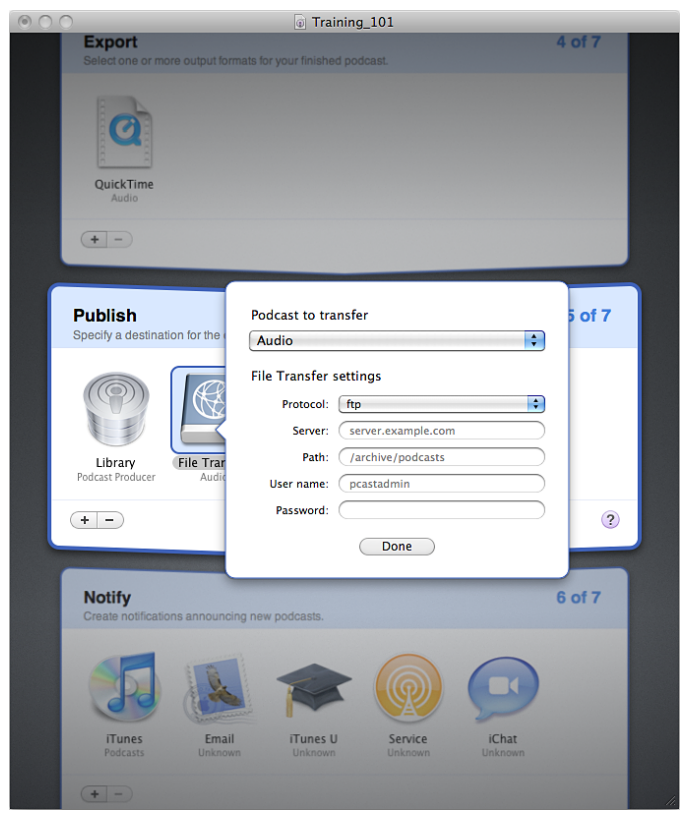
To send a podcast to a backup file system:
- In Podcast Composer, go to the Publish stage (choose Stages > Publish or press Command-5).
- Click the Add (+) button and choose File Transfer. A dialog appears.
- From the “Podcast to transfer” pop-up menu, choose the podcast format for backing up to the file system.
- From the Protocol pop-up menu, choose the file transfer protocol to use.
- In the Server field, enter the address of the server to send the files to.
- In the Path field, enter the path to where the podcast should be stored.
- In the User Name and Password fields, enter the administrator credentials to access the file system.
- Click Done.
- Choose File > Save.
Sending Content to the Watch Folder of Final Cut Server
In the Publish stage of Podcast Composer, you can choose to send content to the Watch folder of Final Cut Server for further processing.
You can add one or more Final Cut Server destinations.
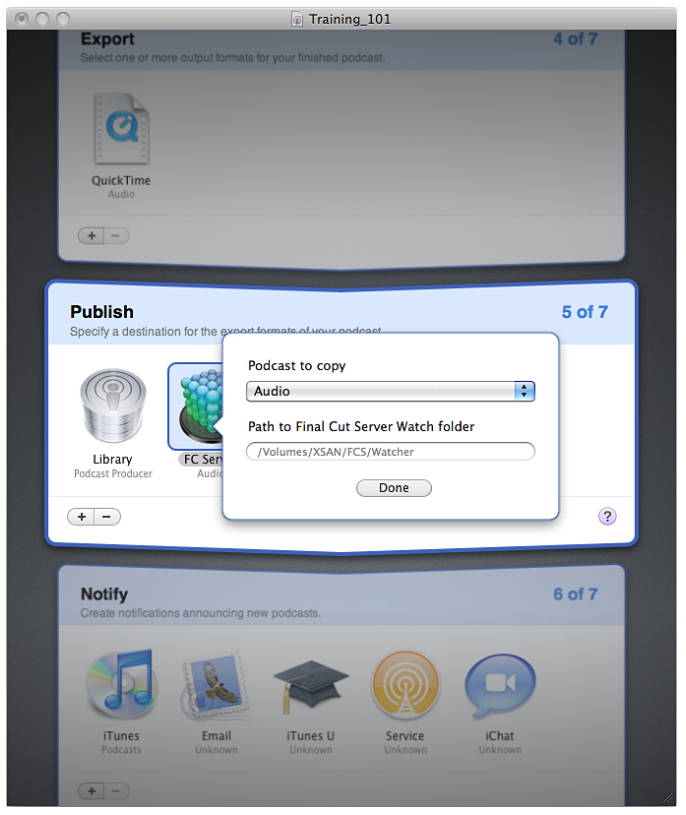
To submit content to Final Cut Server:
- In Podcast Composer, go to the Publish stage (choose Stages > Publish or press Command-5).
- Click the Add (+) button and choose Final Cut Server. A dialog appears.
- From the “Podcast to copy” pop-up menu, choose the podcast format for sending to Final Cut Server.
- In the “Path to Final Cut Server Watch Folder” field, enter the path to the Watch folder.
Important: The path you specify must have write access for the pcastxgrid user. - Click Done.
- Choose File > Save.
Sending Content to a Shared Folder
The Publish stage of Podcast Composer lets you send content to a shared folder. You can add one or more shared folder destinations.
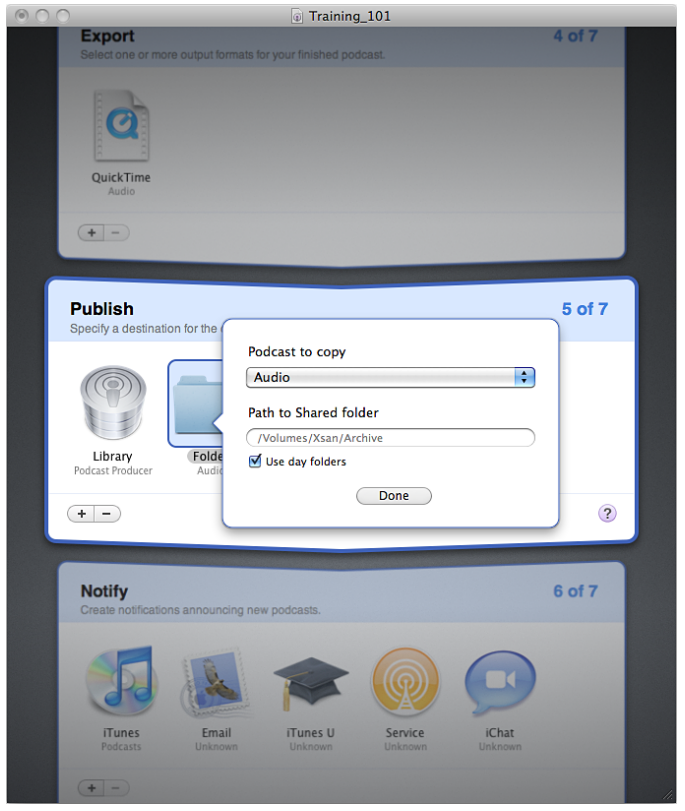
To send content to a shared folder:
- In Podcast Composer, go to the Publish stage (choose Stages > Publish or press Command-5).
- Click the Add (+) button and choose Folder. A dialog appears.
- From the “Podcast to copy” pop-up menu, choose the podcast format for sending to the shared folder.
- In the “Path to Shared Folder” field, enter the path to the shared folder.
Important: The path you specify must have write access for the pcastxgrid user. - To use day folders, select “Use day folders.”
This option creates an intermediate folder for every day of the year to store all content published on that day. - Click Done.
- Choose File > Save
Sending Content to a Workflow
You might want to send your podcast to another custom workflow or workflow chain deployed on the Podcast Producer server to perform additional tasks that you can’t configure in Podcast Composer.
You can add one or more workflow destinations.
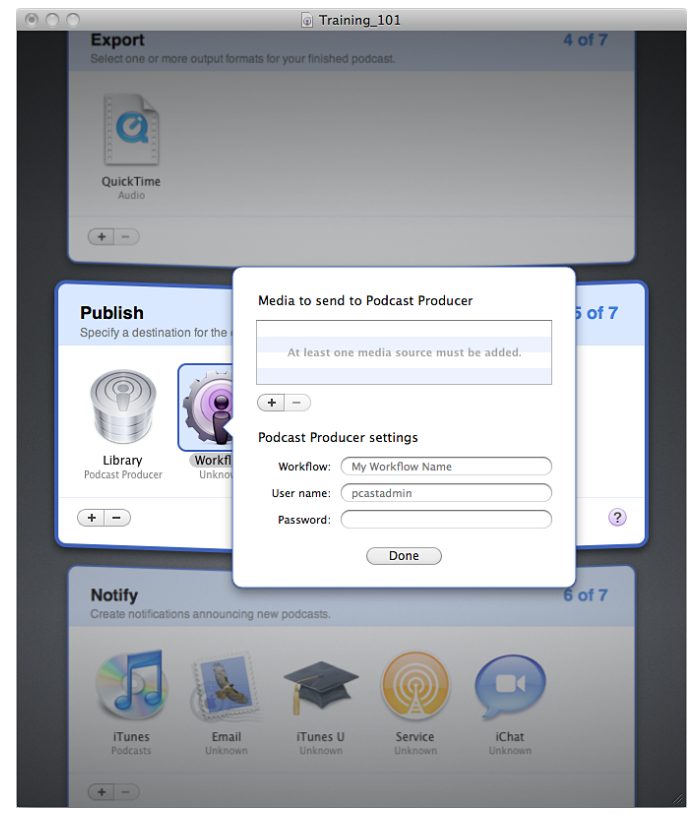
To send content to a workflow:
- In Podcast Composer, go to the Publish stage (choose Stages > Publish or press Command-5).
- Click the Add (+) button and choose Workflow.
A dialog appears. - Click the Add (+) button to add media files to the list of media files to send to Podcast Producer.
- In the Workflow field, enter the name of the workflow that Podcast Producer will use to process the submitted content.
- In the User Name and Password fields, enter the user credentials needed to submit the job to Podcast Producer.
- Click Done.
- Choose File > Save.
Configuring the Notify Stage
Use this chapter to learn how to create notifications, which Podcast Producer sends to announce published podcasts.
In the Notify stage of Podcast Composer, you add and configure notifications to be sent to users announcing the publishing of podcasts.
You can add the following types of notifications:
- iChat
- iTunes Podcast Directory
- iTunes U
- Service
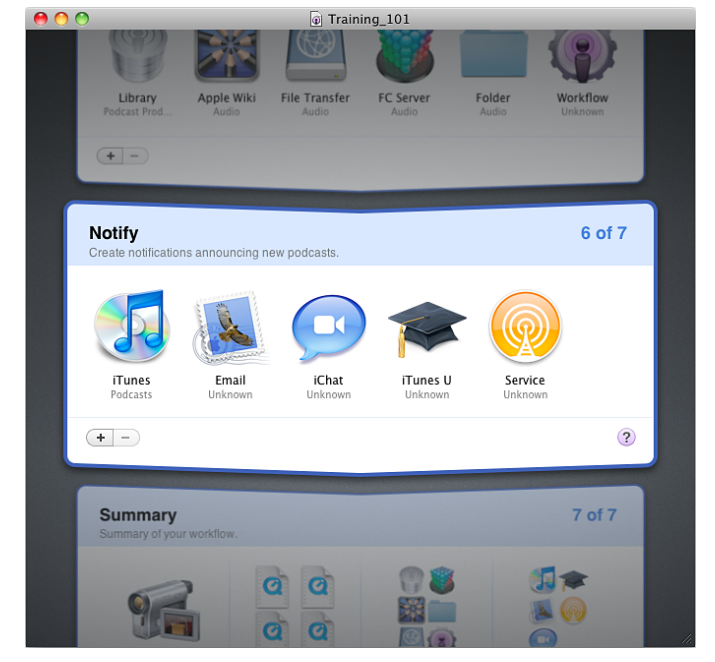
Adding Email Notifications
In the Notify stage, you can add one or more email notifications.

To add an Email notification:
- In Podcast Composer, go to the Notify stage (choose Stages > Notify, or press Command-6).
- Click the Add (+) button and choose Email.
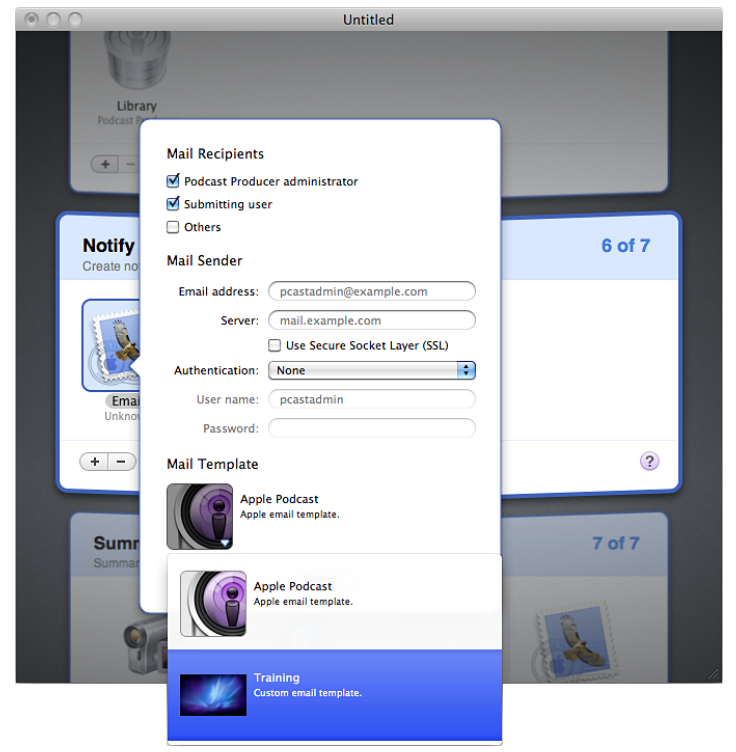
A dialog appears. - Select the mail recipients:
- Podcast Producer administrator—Select this option to send an email notification to the administrator of the Podcast Producer server.
This information is stored in the DIrectory Service. In Workgroup Manager, you can set up this information for every user. - Submitting user—Select this option to send an email notification to the user who submitted the workflow.
This information is stored in the DIrectory Service. In Workgroup Manager, you can set up this information for every user. - Others—Select this option and enter the email addresses (separated by commas) of the notification recipients.
- Podcast Producer administrator—Select this option to send an email notification to the administrator of the Podcast Producer server.
- In the Email address field, enter the address of the person sending the email.
- In the Server field, enter the address of the server used for sending the email.
- If the email requires Secure Socket Layer protection, select Use Secure Socket Layer (SSL).
- From the Authentication pop-up menu, choose the authentication type.
- In the User name and Password fields, enter the administrator credentials to send the email.
- Click Done.
- Choose File > Save.
Adding iChat Notifications
In the Notify stage, you can add iChat notifications.
For iChat notifications to work, you need access to an iChat server running on
Mac OS X Server v10.6. If not, you must set up your own iChat server. Notifications fail if sent through an iChat server running on Mac OS X Server v10.5 or earlier.
However, if you need to send the notifications through an iChat server running on v10.5, you can set up an iChat server on a computer running v10.6 and federate it to an iChat server running on a computer with v10.5. The notifications first go through the iChat server running on the v10.6 computer and then through the iChat server running on the v10.5 server.
The iChat server doesn’t need to run on the Podcast Producer server.
For more information about setting up an iChat server, see iChat Service Administration.
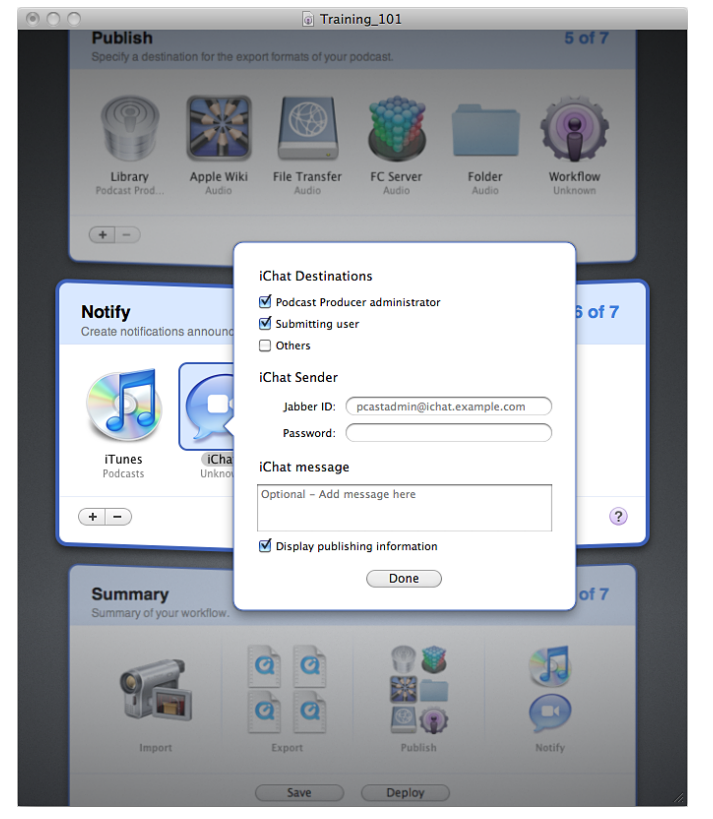
To add an iChat notification:
- In Podcast Composer, go to the Notify stage (choose Stages > Notify, or press Command-6).
- Click the Add (+) button and choose iChat.
A dialog appears. - Select the iChat recipients:
- Podcast Producer administrator—Select this option to send an iChat notification message to the administrator of the Podcast Producer server.
This information is stored in the DIrectory Service. In Workgroup Manager, you can set up this information for every user. - Submitting user—Select this option to send an iChat notification message to the user who submitted the workflow.
This information is stored in the DIrectory Service. In Workgroup Manager, you can set up this information for every user. - Others—Select this option and enter the iChat addresses (separated by commas) of the notification recipients.
- Podcast Producer administrator—Select this option to send an iChat notification message to the administrator of the Podcast Producer server.
- In the Jabber ID and Password fields, enter the administrator credentials to send the iChat message.
iChat notifications work with Jabber accounts only.
The ichat address of the sender should be different from the address of the Podcast Producer administrator and the submitter. - n the iChat message field, enter the text of the notification message to be sent via iChat.
When Podcast Producer receives a job, it generates the properties.plist file which contains metadata, including the Podcast Producer properties defined in Server Admin.
In the iChat notification message, you can add $$KEY$$ variables, which are replaced\ by the values of these keys defined in the properties.plist file.
For example, to display the full name of the user who submitted the job (Bill James), use $$User Full Name$$ in the iChat message. The Xgrid agent processing the job replaces $$User Full Name$$ with Bill James.
For more information about defining Podcast Producer variables and the properties. plist file, see Podcast Producer Administration. - To add publishing information to the iChat message, select “Display publishing
information.” - Click Done.
- Choose File > Save.
Adding iTunes Podcast Directory Notifications
In the Notify stage, you can add only one iTunes Podcast Directory notification. For this notification to work, you must first register your feeds with iTunes. When this notification is sent to iTunes, the iTunes podcast repository syncs with your Podcast Library as soon as possible to reflect all changes. This action is asynchronous
For more information about Podcast Library and how to register feeds with iTunes, see Podcast Producer Administration.
To add an iTunes Podcast Directory notification:
- In Podcast Composer, go to the Notify stage (choose Stages > Notify or press Command-6).
- Click the Add (+) button and choose iTunes Podcast Directory.
- Choose File > Save.
Adding iTunes U Notifications
In the Notify stage, you can add iTunes U notifications. You specify the address of the iTunes U site to send the notification to. Upon receiving the notification, iTunes U syncs with the feeds you registered with it as soon as possible. This action is asynchronous.
Before sending iTunes U notifications, you must register feeds with the iTunes U site. For more information, contact the iTunes U site administrator.
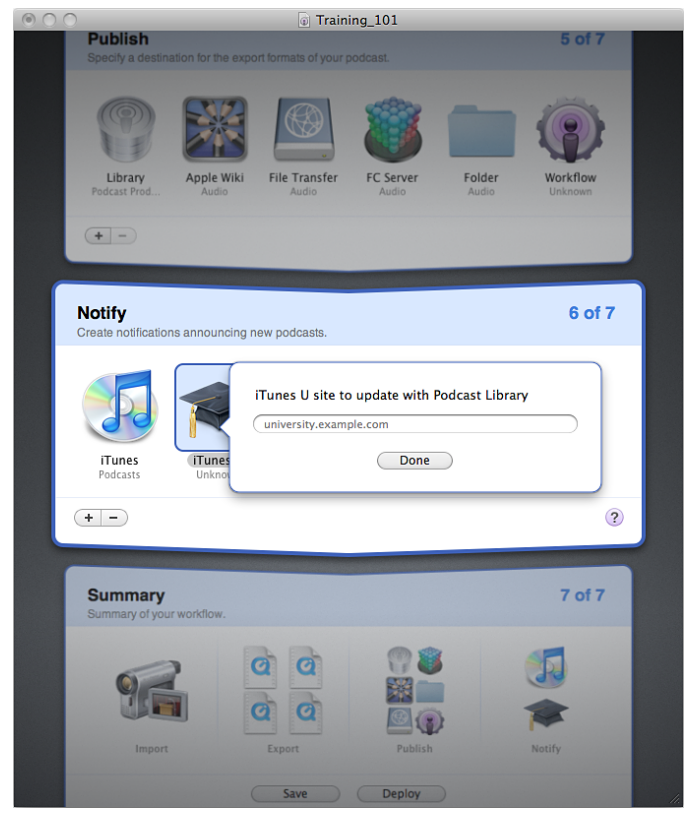
To add an iTunes U notification:
- In Podcast Composer, go to the Notify stage (choose Stages > Notify or press Command-6).
- Click the Add (+) button and choose iTunes U.
A dialog appears. - Enter the address of the iTunes U site.
- Click Done.
- Choose File > Save.
Adding Third-Party Service Notifications
In the Notify stage, you can add Service notifications. You specify the URL of the service to ping.
When the service receives the ping, the service performs the predefined actions.
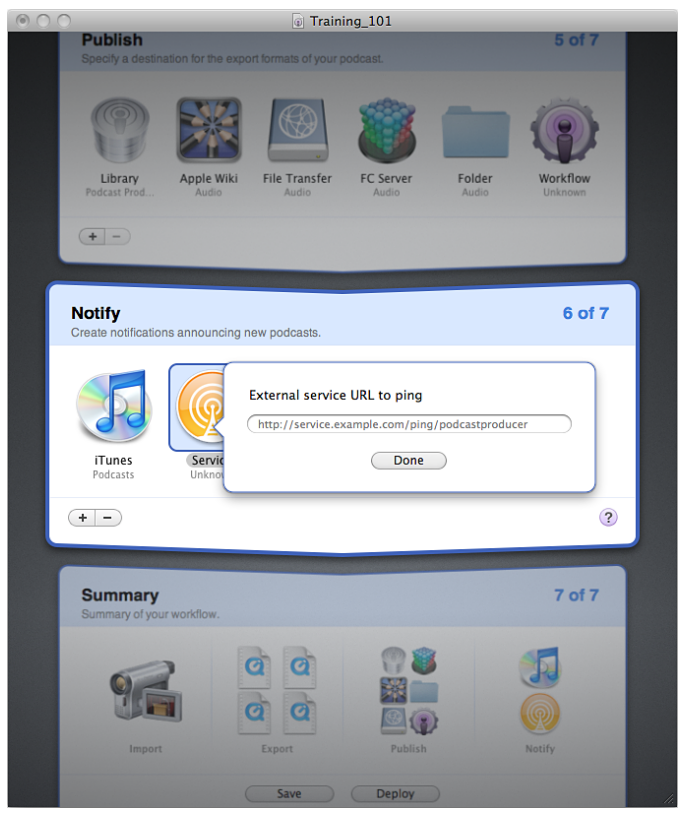
To add a Service notification:
- In Podcast Composer, go to the Notify stage (choose Stages > Notify or press Command-6).
- Click the Add (+) button and choose Service.
A dialog appears. - Enter the URL of the service.
- Click Done.
- Choose File > Save.
Managing Workflows
Use this chapter to learn how to use Podcast Composer to verify, deploy, and manage workflows.
Podcast Composer allows to upload and download workflows from Podcast Producer server. Podcast Composer also allows you to verify workflows to ensure that they contain all required information.
Viewing a Summary of the Workflow
The last stage in Podcast Composer provides a bird’s-eye view of your workflow by listing the icons of the tasks you’ve defined in your workflow. Use this stage to make sure your workflow is complete.
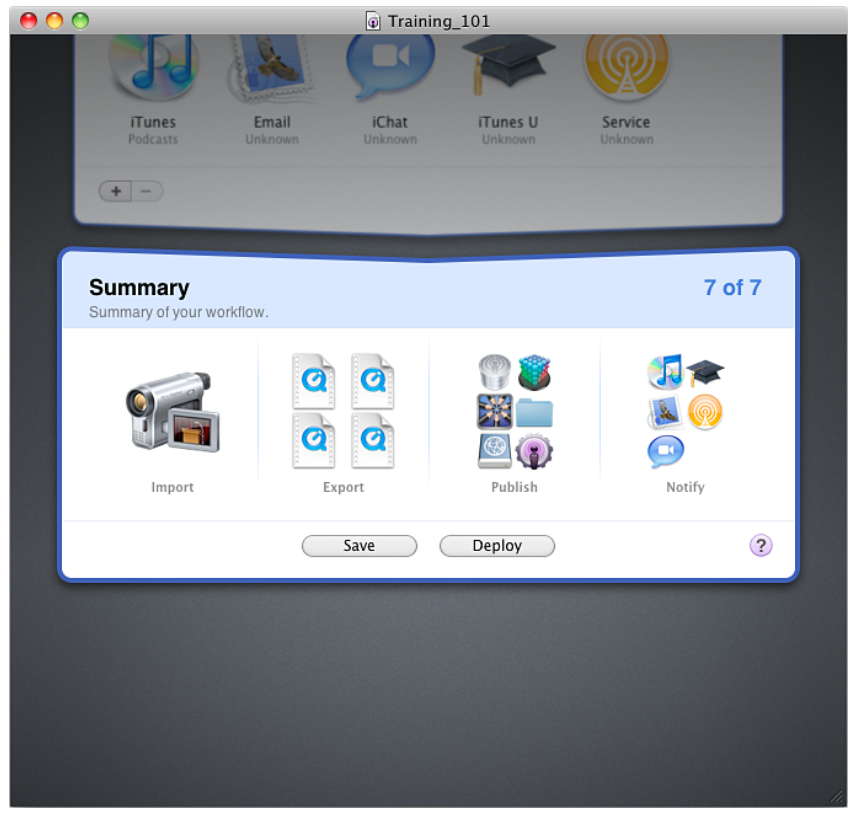
To see a summary of your workflow:
- In Podcast Composer, go to the Summary stage (choose Stages > Summary or press Command-7).
Saving a Workflow
To save a workflow in Podcast Composer, use the Save or Save As command from the File menu. You can also use the Save button in the Summary stage.
When you save a workflow, Podcast Composer generates a workflow bundle that
contains all information and resources needed to process the workflow. This includes images, movies, presets, templates, tools, and compositions used by the workflow.
The workflow bundle also includes workflow metadata, password information, and the XML code that defines the workflow. The bundle also contains your credentials and the Xgrid job template the defines the tasks to execute and which tasks can be executed in parallel.
If the workflow has credentials, they are secured using a master password stored in your keychain.
To save a new workflow:
- Choose File > Save (Command-S) or press the Save button in the Summary stage.
- In the Save As dialog, enter the name of the workflow bundle and specify where to store it.
The name that you enter in this field can be different than the name you specified in the Information stage. - Click Save.
To save changes to an existing workflow bundle, choose File > Save (Command-S) or press the Save button in the Summary stage.
To change the name of a workflow bundle, choose File > Save As (Command-Shift-S). - In the Save As dialog, enter the new name of the workflow bundle.
Note: A workflow can be saved even if not complete and not correct.
Using the Workflow Inspector
The Workflow Inspector in Podcast Composer lets you:
- Specify the poster image for the podcast. This is the image associated with the published podcast. If you don’t specify a poster image, Podcast Composer extracts a poster image from a frame that’s about one third of the way into the presentation.
- View workflow statistics. The inspector displays the number of tasks in the workflow and the maximum number of tasks that can be run in parallel.
- Add notes about the workflow to the Workflow Notes field. These notes are stored as metadata in the info.plist file at the root level of the workflow bundle.
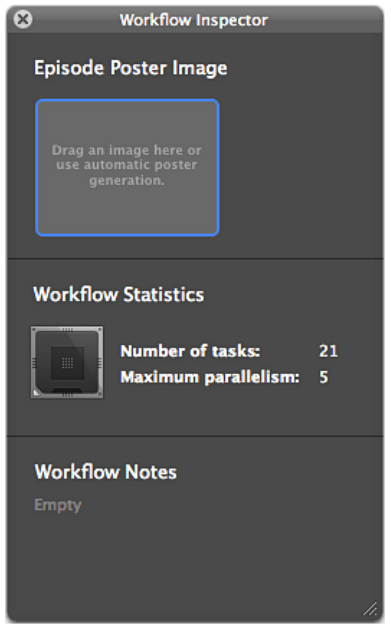
To open the Workflow Inspector:
- In Podcast Composer, choose Window > Workflow Inspector.
- To set the workflow’s poster image, drag a .png or .tiff image onto the Episode Poster Image field.
- To add notes about the workflow, enter the text in the Workflow Notes field.
Verifying a Workflow
Before deploying a completed workflow, it is good practice to verify the workflow, even though Podcast Composer verifies it before deploying it. By verifying the workflow, you can deploy it at a moment’s notice.
To verify a workflow in Podcast Composer:
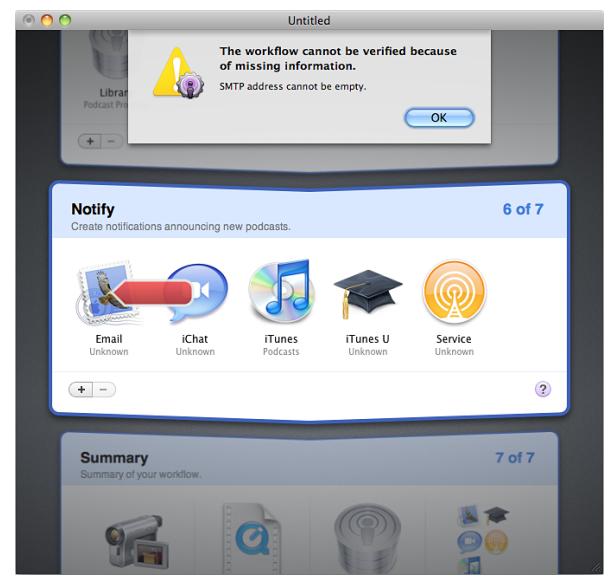
- Choose File > Verify Workflow (Command-Y).
If the workflow isn’t configured correctly, a message appears describing the problem with the first workflow element that has missing settings. Podcast Composer displays a red arrow pointing to the element in question. - If an error message appears:
a Click OK to dismiss the dialog.
b Fix the problem.
c Verify the workflow again.
You might need to repeat these steps several times until the workflow passes verification. - When the workflow is configured correctly and a message appears indicatingsuccessful workflow configuration, click OK.
Deploying a Workflow
When you finish building a workflow, you can use Podcast Composer to upload the workflow bundle to a Podcast Producer server. Podcast Producer makes the workflow available to Podcast Capture clients, as determined by the Podcast Producer administrator.
Before you can deploy a workflow, make sure you have the necessary credentials to access the Podcast Producer server.
To deploy a workflow to a Podcast Producer server:
- In Podcast Composer, choose File > Deploy to Server (Command-U) or press the Deploy button on the Summary stage.
If your workflow is incomplete, a dialog appears describing the problem with the first incomplete setting in the workflow. Podcast Composer displays a red arrow pointing to the element that has the incomplete setting. - 2 If a dialog appears indicating that the workflow is incomplete, click the OK button to dismiss the dialog, fix the problem, and then try to deploy the workflow again.
You might need to repeat the process several times until the workflow passes verification. - In the Server field of the Deploy dialog, enter the address of the Podcast Producer server or choose a server from the pop-up menu.
- Click Deploy.
- In the Name and Password fields, enter the administrator user name and password assigned to you by the Podcast Producer administrator.
If a workflow with the same name or same unique identifier exists, Podcast Composer prompts you whether to overwrite the workflow, install the workflow with a different unique identifier, or cancel the operation.
What makes a workflow unique is a unique identifier (UUID). This means that you can have multiple workflows with the same name, as long as the UUIDs are different. - Click Deploy again.
A dialog box appears indicating that the workflow was successfully uploaded to the Podcast Producer server.
When you deploy a workflow, Podcast Producer changes the name of the workflow to an automatically generated name. For example:
631CDEA3-AC0D-4DC8-BF7E-1A24DC306A02.pwf
Podcast Producer also adds checksum information to the workflow to ensure integrity.
Opening a Workflow Remotely
To make a local copy of a workflow residing on a Podcast Producer server, use the File > Open Remote command in Podcast Composer.
To open a workflow remotely in Podcast Composer:
- Choose File > Open Remote (Command-Shift-O)
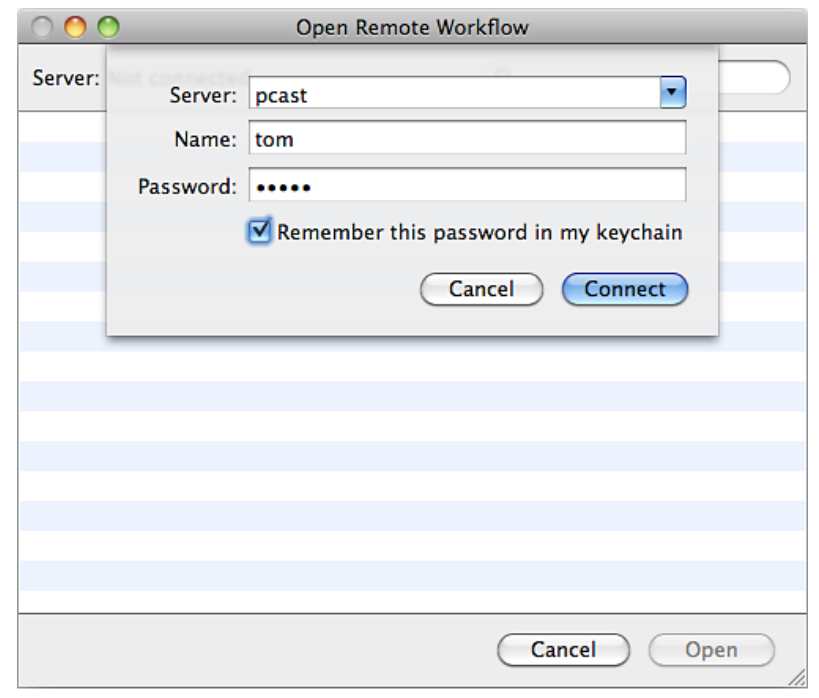
- In the Server field of the Open Remote Workflow window, select a Podcast Producer server or enter its and then click Connect.
- In the Name and Password fields, enter the user name and password assigned to you by the Podcast Producer administrator.
- Click Connect again.
- Choose the workflow you want to edit from the Workflow list.
- Click Open.
- In the Save As field, enter the name of the workflow.
- In the Where field specify where to store the workflow.
- Click Save.
Podcast Composer opens the workflow so you can make changes to it.
Advanced Podcast Composer Topics
Use this chapter to perform advanced Podcast Composer tasks such as customizing email templates and Quartz Composer compositions.
Extending Podcast Composer Workflows
Podcast Composer helps you quickly generate self-contained workflows that are ready for deployment. However, you might want to extend your workflow in a way that isn’t possible in Podcast Composer.
To extend your workflow, you can configure it in the Publish stage of Podcast
Composer to send the output of the workflow to another workflow that you manually created. The second workflow adds your custom tasks to the workflow for execution.
Alternatively, you can take the workflow generated by Podcast Composer and extend it manually. To learn more about workflows and how to configure them manually, see Podcast Producer Administration and Podcast Producer Workflow Tutorial.
WARNING: If you create a workflow using Podcast Composer and then manually extend the workflow, you can’t edit it again in Podcast Composer.
Making Resources Available to Podcast Composer
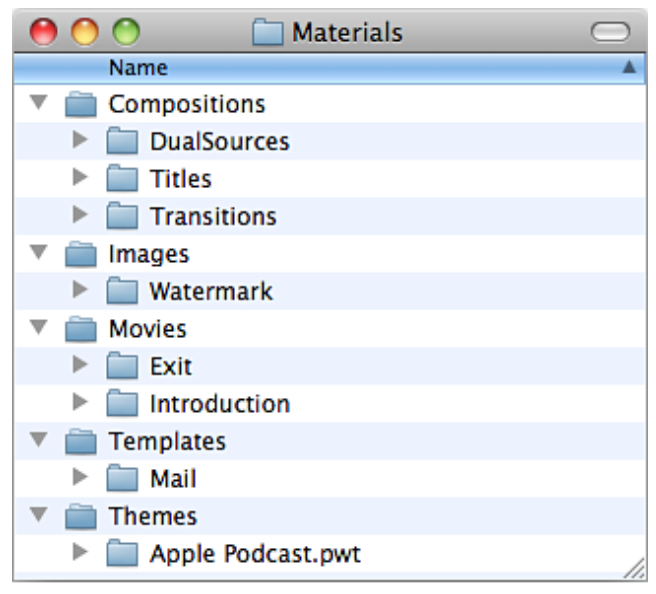
Podcast Composer stores all the resources needed to build a workflow in its
application bundle. These resources are grouped in the /Applications/Server/Podcast Composer/Contents/Resources/Materials/ folder.
These resources are:
- Compositions
- Images
- Movies
- Templates
- Themes
When you create a new workflow in Podcast Composer, only resources inside the
application’s bundle are available to you. If you need to add your own resources (for example, a watermark or introduction and exit movies), you have to manually add them through drag and drop or by browsing.
However, you can make your own resources available to Podcast Composer by storing them in one of the following folder:
- /Library/Application Support/Podcast Composer/Resources/—Resources stored in this folder are available to all users.
- ~/Library/Application Support/Podcast Composer/Resources/—Resources stored in this folder are available to one user.
By default, the ~/Library/Application Support/Podcast Composer/Resources/ folder
contains an empty folder structure that mimics the folder structure of the the contents of the /Applications/Server/Podcast Composer/Contents/Resources/Materials/ folder.
To store resources in the /Library/Application Support/Podcast Composer/Resources/ folder, you must first create the same folder structure as that of the Materials folder.
Important: If two resources with the same name are in the ~/Library/Application Support/Podcast Composer/Resources/ and /Library/Application Support/Podcast Composer/Resources/ folders, Podcast Composer lists both.
To make your resources available to Podcast Composer:
- Quit Podcast Composer.
- Store the resources in the relevant folders.
For example, to make your introduction movies available to Podcast Composer, store them in the ~/Library/Application Support/Podcast Composer/Resources/Movies/ Introduction/ folder. - Launch Podcast Composer.
- Verify that the resources are now available to Podcast Composer.
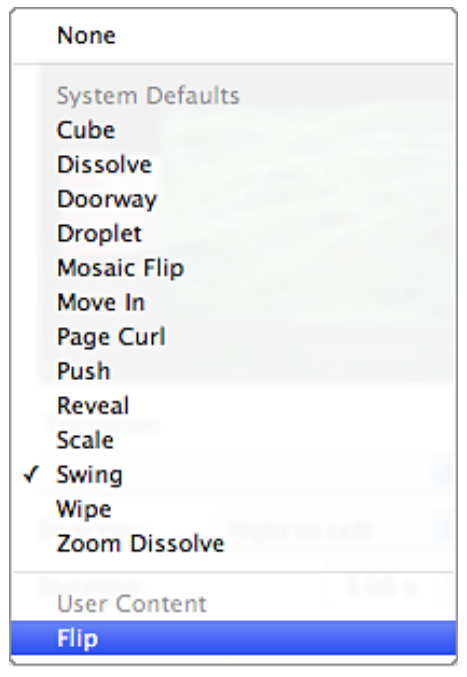
For example, to verify that your custom introduction movie is now available to Podcast Composer, in the Edit stage, double-click the Introduction movie icon. Your movie should be listed in the User Content section of the Introduction movie pop-up menu.
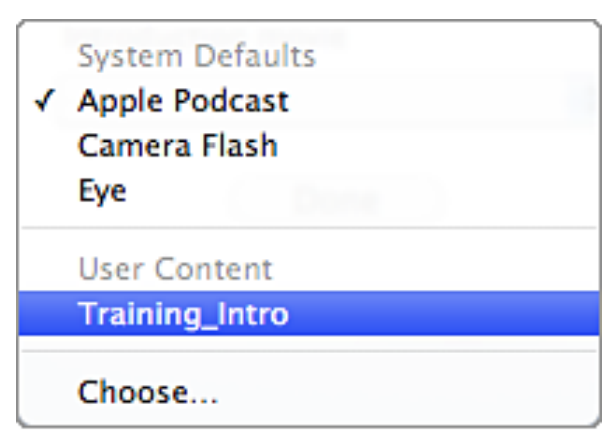
![]() Tip: When you highlight a resource in the User Content section of the pop-up menu, a tooltip displays the path to the resource.
Tip: When you highlight a resource in the User Content section of the pop-up menu, a tooltip displays the path to the resource.
Working with Themes
By default, Podcast Composer ships with one theme. However, if you add custom themes, Podcast Composer displays the Theme button in the Edit stage, which lets you select a theme to apply to your podcast.
- “Customizing Podcast Composer Themes”
- “Applying a Theme to a Podcast”
Customizing Podcast Composer Themes
Podcast Composer ships with only one theme bundle (Apple Podcast.pwt). This theme is in /Applications/Server/Podcast Composer/Contents/Resources/Materials/Themes/.
A theme defines the following aspects of a podcast:
- Introduction movie—Whether to add an introductory movie to the podcast.
- Introduction movie transition—Whether to add a transition between the
introductory movie, and the following movie and the properties of the transition. - Watermark properties—Whether to add a watermark to the input movie, and the properties of the watermark.
- Title movie—Whether to add a title movie to the podcast.
- Title movie transition—Whether to add a transition between the title movie and the input movie, and the properties of the transition.
- Exit movie—Whether to add an exit movie to the podcast
- Exit movie transition—Whether to add a transition between the input movie and the exit movie, and the properties of the transition.
To create themes, copy the default theme (Apple Podcast.pwt), rename the copy, and customize it as needed.
If you plan to deploy multiple computers for creating workflows in your organization using Podcast Composer, make sure the files referenced by the theme are accessible from all computers.
To create a custom theme:
- Copy the default theme (/Applications/Server/Podcast Composer/Contents/Resources/ Materials/Themes/Apple Podcast.pwt) to the following folder:
~/Library/Application Support/Podcast Composer/Resources/Themes/
If this folder is not there, create it. - Rename the theme bundle.
- Open the bundle.
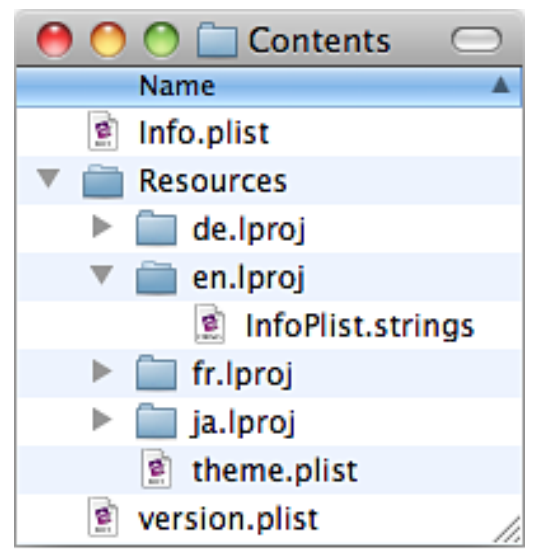
- Modify the following files:
- Contents/Info.plist—See “Modifying Info.plist”
- Contents/Resources/en.lproj/InfoPlist.strings—See “Modifying InfoPlist.strings”
- Contents/Resources/theme.plist—See “Modifying theme.plist”
You can also add your own resources to the bundle if needed.
When modifying these file, you can test your changes by restarting Podcast Composer and applying your custom theme.
Modifying Info.plist
In the Contents/Info.plist file, change the values of the following keys:
- CFBundleIdentifier—Change the last part in the theme bundle identifier to reflect the name of your theme bundle: com.apple.PodcastWorkflow.theme.custom_name
- CFBundleName—The name of the theme bundle. This name should match the last part of the theme bundle identifier.
- Version—Specify the version of the theme.
Modifying InfoPlist.strings
For every supported language in the theme bundle, there is an InfoPlist.strings file, which contains localized strings. The English version of InfoPlist.strings is in Contents/ Resources/en.lproj/InfoPlist.strings.
In the InfoPlist.strings file for every language you’re supporting, change the values of the following keys:
- Copyright—The copyright string for this theme.
- Description—The description of the theme.
- Name—The name of the theme. This name, unlike the name of the theme bundle, can contain spaces.
Modifying theme.plist
The Contents/theme.plist file defines the theme’s attributes. You can customize the following attributes of a theme:
- Introduction movie
- Introduction movie transition
- Watermark properties
- Title movie
- Title movie transition
- Exit movie
- Exit movie transition
Specifying the Introduction Movie
In the theme.plist file, the intro key lets you define the path to the introduction movie.
To specify an intro movie, under intro, replace the value of the path key with the path to your introductory movie.
If Podcast Composer cannot find your movie, it uses the introduction movie of the default theme (Apple Podcast.pwt).
Configuring the Introduction Movie Transition
To configure the introduction movie transition, under the introTransition key, modify the values of the following keys.
- direction—The direction of the transition as a number between 0 and n-1, where n is the possible number of directions.
- duration—The duration in seconds.
- path—The path to the Quartz Composer transition.
Configuring the Title Movie
In the theme.plist file, the title key lets you configure a title movie
To specify a title movie, under title, modify the values of the following keys:
- authorEnabled—If true, adds the name of the person submitting the podcast to the title movie.
- copyrightEnabled—If true, adds the copyright text (defined in the Default Properties list of Podcast Producer in Server Admin) to the title movie.
- dateEnabled—If true, adds the date on which the podcast was submitted.
- descriptionEnabled—If true, adds the description (provided by the person
submitting the podcast) to the title movie. - organizationEnabled—If true, adds the name of the organization (defined in the Default Properties list of Podcast Producer in Server Admin) to the title movie.
- path—The path to the Quartz Composer composition that defines how the title movie is rendered.
- titleEnabled—If true, adds the title of the podcast (provided by the person
submitting the podcast) to the title movie.
Configuring the Title Movie Transition
To configure the title movie transition, under the titleTransition key, modify the values of the following keys:
- direction—(If applicable) The direction of the transition as a number between 0 and n-1, where n is the possible number of directions.
The numbers match the array provided by the transition in the Info.plist file of the transition. - duration—The duration in seconds.
- path—The path to the Quartz Composer transition.
Configuring the Watermark
In the theme.plist file, the contentWatermark key lets you configure a title movie.
To configure the watermark, under contentWatermark, modify the values of the following keys:
- opacity—The opacity of the watermark as a numerical value between 0 and 100, with 0 being invisible and 100 being opaque (no transparency).
- path—The path to the watermark. Ideally, the watermark must be a .png file.
However, you can use other formats such as jpeg and PDF. - position—The position of the watermark as a number between 0 and 3:
- Top left: 0
- Top right: 1
- Bottom left: 2
- Bottom right: 3
- sizing—The size of the watermark as a value between 0 and 40.
Specifying the Exit Movie
In the theme.plist file, the outro key lets you define the path to the exit movie.
To specify an exit movie, under outro, replace the value of the path key with the path to your exit movie.
If Podcast Composer cannot find your movie, it uses the exit movie of the default theme (Apple Podcast.pwt).
Configuring the Exit Movie Transition
To configure the exit movie transition, under the outroTransition key, modify the values of the following keys:
- direction—(If applicable) The direction of the transition as a number between 0 and n-1, where n is the possible number of directions.
The numbers match the array provided by the transition in the Info.plist file of the transition. - duration—The duration in seconds.
- path—The path to the Quartz Composer transition.
Applying a Theme to a Podcast
Themes provide a consistent look and feel to your podcast, especially if your podcast consists of movies created by different people.
To select a theme for your podcast:
- In Podcast Composer, go to the Edit stage (choose Stages > Edit or press Command-3).
- Click the Theme button in the Edit stage of Podcast Composer.
- Choose a theme from the pop-up menu.
A dialog appears prompting you to confirm that changing the theme modifies your current settings in the Edit stage. - Click Yes to change the theme; otherwise, click No.
- Choose File > Save.
Working with Quartz Composer Compositions
Podcast Composer provides a number of Quartz Composer compositions. However, you can create your own and make them available to Quartz Composer.
- “Creating Quartz Composer Compositions”
- “Selecting a Custom Quartz Composer Compositions”
Creating Quartz Composer Compositions
You can customize Quartz Composer compositions that ship with Podcast Producer or you can create your own compositions. However, you must have strong familiarity with Apple’s Quartz Composer, the application you use to create Quartz compositions.
The default Quartz Composer compositions that ship with Podcast Producer are in the following folder:
/Applications/Server/Podcast Composer/Contents/Resources/Materials/Compositions/
This folder contains the following folders:
- DualSource
This folder stores the dual source transitions, which you can access in the Edit stage of Podcast Composer. For example, the Keynote.pqz bundle represents the Keynote composition. - Titles
This folder contains two folders:
Bumper contains the bumper title composition bundles.
Overlay contains the overlay title composition bundles. - Transitions
This folder contains the transition bundles.
To customize Quartz Composer compositions or create new ones, you must install Quartz Composer on your computer. Quartz Composer is included with the Mac OS X developer tools.
To customize Quartz Composer compositions:
- Copy the Quartz Composer composition you want to edit to the relevant folder inside the following folder:
~/Library/Application Support/Podcast Composer/Resources/Compositions/ - Rename the Quartz Composer composition.
The name of the Podcast Producer Composition that wraps a Quartz Composition must end with .pqz. - Locate the Info.plist file inside the Quartz Composer composition bundle (Contents/ Info.plist).
- Open the Info.plist file.
- Change the value of the CFBundleIdentifier key by replacing the name of the old Quartz Composer composition with the new name.
The value of this key should match the name of the composition bundle. For
example, if you copy a dual source composition and name it C2.pqz, the value of the CFBundleIdentifier key should be com.apple.PodcastProducer.composition.dualsource.C2.
You can also change the Threshold key in the Info.plist file for dual source
compositions. This key defines the length of time the video has to stay static before a transition is triggered.
The default values of the Threshold key are:- Overlay composition: 20 seconds
- Keynote composition: 15 seconds
- Overlay with Fade composition: 10 seconds
- Theater composition: 20 seconds
- Change the values of the localized keys listed in Info.plist.
For example, to change the values of the English strings, open Contents/Resources/ en.lproj/InfoPlist.strings and change the Copyright, Name, and Description strings to reflect the properties of the new composition. - Save Info.plist.
- Locate the Quartz Composer file (ends with .qtz) which defines the composition.
For example, Contents/Resources/DualSource.qtz.
A .qtz file is a Quartz Composer composition. - Rename the file.
- Open the Quartz Composer file using Quartz Composer, customize it as needed, and save your changes.
- Replace the Preview.mov file (Contents/Resources/Preview.mov) with a new preview movie of the composition.
Selecting a Custom Quartz Composer Compositions
Custom Quartz Composer compositions appears in the User Content area of the
pop-up menu listing all available compositions.
Customizing the Email Template
Podcast Composer uses an email template to compose email notifications.
This template resides inside the Podcast Composer application bundle
(/Applications/Podcast Composer/Contents/Resources/Materials/Templates/Mail/).
You can customize the template in two ways:
- Modify the images used by the default email template
- Modify the template itself, which is not recommended unless you have the
requisite knowledge.
If you add a custom email template, Podcast Composer displays the Mail Template button in the Email dialog, which lets you select the mail template to use.
To customize the email template:
- Locate the Podcast Composer email template bundle:
/Applications/Podcast Composer/Contents/Resources/Materials/Templates/Mail/Apple
Podcast.pmu - Copy the email bundle “Apple Podcast.pmu” to the following folder:
~/Library/Application Support/Podcast Composer/Resources/Templates/Mail/ - Rename the email bundle.
- In the Contents/Info.plist file inside the bundle, change the value of the
CFBundleIdentifier key by replacing ApplePodcast with the new name.
This name need not be the same as the name of the .pmu bundle. No spaces are allowed in the name. This name serves as a unique identifier of the bundle. - In the Contents/Resources/en.lproj/InfoPlist.strings, change the values of the Copyright, Name, and Description Strings.
The Name string contains the name of the template that appears in Podcast Producer.
If you support other languages, modify the corresponding InfoPlist.strings file. - In the Contents/Resources/en.lproj/Localizable.strings file, change the strings that appear in the email notifications.
If you support other languages, modify the corresponding Localizable.strings file. - To customize the images used in the email notifications, replace the contents of the PodcastCapture.png and Spacer.png files (in /Resources/Images/) with your own content.
Do not change the names of these files because they are referenced in the
part.html.erb file. - To customize the actual email template, edit the HTML code in the following file:
~/Library/Application Support/Podcast Composer/Resources/Templates/Mail/Apple Podcast.pmu/Contents/Resources/Templates/part.html.erb
CAUTION: When editing this file, take extra caution. If this file is not edited properly, email notifications might fail.
![]() Apple Inc.
Apple Inc.
© 2009 Apple Inc. All rights reserved.
The owner or authorized user of a valid copy of Mac OS X Server software may reproduce this publication for the purpose of learning to use such software. No part of this publication may be reproduced or transmitted for commercial purposes, such as selling copies of this publication or for providing paid-for support services.
Every effort has been made to make sure that the information in this manual is correct. Apple Inc. is not responsible for printing or clerical errors.
Apple
1 Infinite Loop
Cupertino CA 95014
408-996-1010
www.apple.com
The Apple logo is a trademark of Apple Inc., registered in the U.S. and other countries. Use of the “keyboard” Apple logo (Option-Shift-K) for commercial purposes without the prior written consent of Apple may constitute trademark infringement and unfair competition in violation of federal and state laws.
Apple, the Apple logo, Final Cut Studio, iCal, iChat, Keynote, Leopard, Mac, Macintosh, Numbers, Pages, QuickTime, Xgrid, and Xserve are trademarks of Apple Inc., registered in the U.S. and other countries. Finder, iPhone, and Snow Leopard are trademarks of Apple Inc.
Adobe and PostScript are trademarks of Adobe Systems Incorporated.
UNIX® is a registered trademark of The Open Group.
019-1407/2009-08-01

PDF Resource
Apple Mac OS X Server Podcast Composer User Guide Version 10.6 Snow Leopard User Manual OPTIM PDF